Friday, September 30, 2016

Technique of the Week: Stampboard Watercolor


Special thanks to Kae Pea from Rubbermoon for the inspiration for this technique!

This is actually not so much a technique as it is discovering a new (for me) medium. I recently was on Facebook, and I saw a live post from Kae Pea of Rubbermoon, where she was doing watercolor painting on clay board, or stampboard. 

By the way, I just want to take a moment to say if you have not "liked" Rubbermoon's page on Facebook, be sure to do that right now! She does live instructional videos, and posts lot of inspirational art. For that matter please "like" the Art 'n Soul page, and the Magenta page also, you won't regret it! 

Let me start out by saying that Kae Pea makes it look so very easy, but she has a lot of experience with painting. My big take-away from the experience is that it was just a lot of fun to paint on the stampboard. It's a very forgiving surface - no pilling, no warping. Kae Pea chose to paint on a 2"x 2" stamp board piece, and I chose a 3.5" x 5" piece. We do have lots of Stampboard in various sizes in stock at Art 'n Soul, as well as a tool for scraping (please read to the end of this technique where I mention scraping).


First I stamped my Magenta leaf image (0454.J) using Ranger Archival Sepia ink. I dried the image with a Ranger Heat-It tool, just by waving the heated air lightly over the board. Stamp board can bubble if it gets too hot, so be careful with this step.

I decided to paint the leaf images with Nuance, and chose Bright Yellow, Yellow Orange, Orange, Nutmeg, and Red. For the sky I chose Royal Blue, Aquamarine and Turquoise. I tapped some of each color into a palette  and added water mixed with a little Perfect Pearls powder for some shimmer.

In her video, Kae Pea had recommended to paint the image with water first to help the paint flow better. I worked in small areas at a time and layered the colors onto the leaf images. When I was happy with the leaves, I painted the three shades of blue all around the leaves as though they were falling through the sky.

At the end I added a little mica watercolor from an Artquest Palette in gold, copper and silver. I also flicked the mica watercolor over the images.

The last thing I did was to stamp a Magenta sentiment (Thinking of You 07.869.D) in the corner using Ranger Archival Jet Black ink.

One of the cool things about stampboard is that you can use a tool or craft knife and scrape paint off. You can create highlights, or just scrape away where you painted outside the lines. It's a very forgiving surface, and it took the paint very well and dried quickly. This project was a lot of fun to paint! I think this would be lovely as the front of a little book or journal. Kae Pea made her 2"x 2" pieces into little gift magnets - so cute!

You can see more photos of this project at my Backporch blog here.

This weekend is Recycled Rubber at Art 'n Soul, but NEXT weekend, on Saturday, October 8, from 10:30 a.m. - 1:30 p.m., LISA LEE of Inchie Arts will be holding a fantastic workshop class: Garden Photo Cards. We cannot recommend this class to you enough. You will love it! Lisa will bring in her many, many fabulous photos of gardens and garden art, and lots and lots of inches, and you will be able to make as many cards as you can in 3 hours. These are stunning cards that you can use for almost any occasion. Here is the class description:

Lisa Lee of Inchie Arts is back with a relaxing workshop. She has a huge inventory of beautiful garden photos for your cards. Join her for a relaxing morning cutting up photos, mounting them on Art Squares and creating beautiful all occasion cards. You'll make at least 5 or 6 cards, more if time allows. Please bring your basic kit. 


As many of you know, Vesta Abel from Arizona was recently at Art 'n Soul to teach several amazing classes. Our customer and friend, Barbara Hojem took the Goddess Greeting card class, and came into the shop to show us one of her completed cards. We were blown away, and are sure that you will be too!

by Barbara Hojem

If you receive our email newsletter, or you have liked our page on Facebook, you know that we are having a HUGE Recycled Rubber event this weekend. Honestly we have rarely seen so many stamps, as well as lots of dies and punches. Lots and lots of other treasures to be found as well. We will be open for Recycled Rubber on Saturday, October 1st from 10:00 a.m. - 5:00 p.m., and on Sunday, October 2nd from 12:30 p.m. - 5:00 p.m. Please come! You will be glad you did.

Just some of the treasures that will greet you at Recycled Rubber at Art 'n Soul!

We have orders coming in soon from Penny Black and our large distributor with lots and lots of new merchandise, so check in with us very soon! We have also sent orders in to Memory Box and Impression Obsession. Check with us every day, you know how fast these orders fly in and then out!

Friday, September 16, 2016

Technique of the Week: Rainbow Beam Blending

This technique is from Laura Bassen, and it makes a quick, easy and beautiful background. 


You will use Distress blending for this technique, but you will do it through a stencil. This makes the blending so much easier. You don't have to be as careful because you will not get the splotches that you sometimes might get with regular blending.

First I die cut a panel from Neenah Solar White 80# cardstock, using the Lawn Fawn LF768 Stitched Rectangle Stackables die. I used the largest one that gives me a panel approximately 5" x 3.75".

I taped the panel to my craft sheet, and then taped down a Magenta stencil (TM-147 Stained Glass) centered on the panel. I then got two pieces of Post-it tape to use as masking.

Starting at the left bottom corner of the panel with the stencil over it, I put the two pieces of tape close together and then wider apart going up to the top right. This creates a long triangular shape like a beam of light.

To do the blending, I used three colors of Distress ink (Wilted Violet, Peacock Feathers, and Twisted Citron). I started with Twisted Citron, and working from the bottom to the top, I applied the color with a mini blending tool. This goes very fast, since you don't have to worry so much about building up your color.

I then moved the pieces of tape, allowing part of the initial color to show and some white area. I applied the next color, Peacock Feathers, and quickly blended it into the partial line of Twisted Citron that was showing. I worked across the entire card this way, moving the tape and randomly choosing another of the three colors to blend with.

When I removed the tape and the stencil at the end, the results were striking. You can do this technique with lots of different stencils and colors of ink to create a unique one layer card.

To finish the card, I stamped Happy Birthday, using Magenta's beautiful birthday stamp 07.305.G and Versamark Ink. I thought this looked like a birthday card, and this stamp fit in the opening of the Stained Glass stencil perfectly. I embossed the image with Judikins White Diamond embossing powder.

I matted the panel on So Silk Shocking Green cardstock, which goes very well with Twisted Citron Distress ink. I scattered a few sequins, and it was finished! This technique was easy and fast to do, and I hope you will give it a try. You can see more of the step by step photos on my Backporch blog here.


Other Art 'n Soul news:

Come in to Art 'n Soul this weekend and take a fabulous class with Vesta Able! Vesta will be here all weekend for 3 amazing classes! Scroll down for complete info; we still have a few spots left! When Terry Medaris was here, he had wonderful things to say about Vesta and her talent and creativity. We are so lucky to be able to have Vesta here to teach. 

Five new Nuance colors are coming soon from Magenta.  These colors are in production and they will be out very soon, and they are perfect for Fall! We will be the first store to receive these, so if you want them (and you are going to want them) be sure to put in a paid pink sheet order to reserve your set.

We got our Ranger order, and the new Distress Crayon sets are here! Beautiful colors! We also have Yupo paper and lots of the new alcohol ink colors. If you have not used alcohol ink and Yupo paper, we would love to show it to you. You can make the most beautiful backgrounds. We are also all stocked up on the new and beautiful Enamel Accents from Ranger.


Sets 4 and 5 Distress Crayons

New colors of Alcohol Ink and Yupo paper


Enamel Accents from Ranger


Friday, September 9, 2016

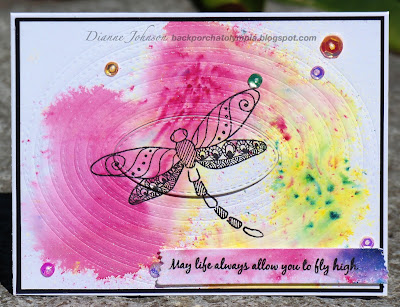
Technique of the Week: Die Impression Backgrounds by Dianne Johnson

I got the idea for this from Jennifer McGuire. I have posted techniques before showing how to use your dies to emboss. This takes that a step further and becomes the whole background. Jennifer's idea was to use nesting dies to create an interesting background.


In this case, I used the Memory Box 30069 Stitched Oval Layers, which we have in stock at Art 'n Soul right now!


I also used my Magenta Zen Dragonfly 44.018.K, and the Magenta sentiment "May life always allow you to fly high" 07.514.G.

First, I laid down 3 rows of scotch tape, sticky side up, and started placing the oval layers onto the tape. The tape keeps the ovals in place. You want them to be as evenly spaced as possible.

I used a panel of watercolor paper onto which I had splashed some Nuance color. I stamped the Zen Dragonfly in Versafine Onyx black ink. I centered the dies over the panel with the cutting side against the paper, and taped them down with washi tape. 


With my base plate configured for embossing (one tab open) I placed my metal shim down, then the dies against the metal shim, with the paper up (cutting side of the dies against the paper). I use this method to keep my dies from getting bent. Next I put a brown rubber embossing mat on top; one piece of cardstock for an additional shim; then both cutting plates on top of that.

The proper sandwich for this is the trickiest part of this technique. You want there to be enough pressure to make a good impression but not too much pressure so that the paper tears. Everyone's die cutting machine is a little different, so you will have to experiment. I had first experimented with regular 80# cardstock, and the metal shim provided too much pressure. Just one piece of additional cardstock for a shim was the perfect amount. However, with the much heavier weight of the watercolor cardstock, the metal shim was needed to give a good impression. The rubber mat is what prevents the dies from cutting.

I absolutely loved the look the embossed ovals gave to my panel! I elected to go one step further and die cut the very center of my panel with the smallest oval. This part of the panel was where most of the dragonfly image was stamped. I popped up the image in the center.

I stamped the sentiment and die cut it with one of the strip dies from Die-namics Blueprints 13. The sentiment was popped up and sequins were added.

The card was matted with So-Silk black cardstock. I hope you give this technique a try. It was easy and it really gives texture and interest to a card. 


To see additional pictures of the process of this technique, please visit my blog at Backporch here.

Great News!!
Our Ranger order is scheduled to be delivered on Wednesday! We will be receiving more of the great Enamel Accents in all of the colors; some Tim Holtz multi media dies with Halloween and Christmas themes; more Yupo paper and the new alcohol ink colors; THE TWO NEW SETS OF DISTRESS CRAYONS ARE COMING!!! WEDNESDAY! BE THERE!

Pam Nelson will be teaching her fabulous class on alcohol inks on Yupo paper. There are two spots left in the afternoon class from 2:00-4:30. Call in and sign up for this great class. You will be so glad you did!

Here is one of the gorgeous samples from Pam's class


Friday, September 2, 2016

Technique of the Week: Recycled Art Materials by Marj Marion

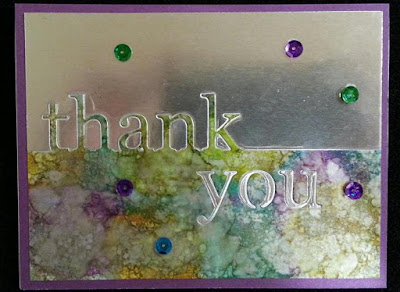
Marj has found a fun use for those foil "security" liners covering various yogurt containers! Here's how she creates interesting cards using these liners, some dies, and some embossing folders.


After washing the liners to remove any food particles, dry the foil liner, and use a bone folder or brayer to flatten the liner and any wrinkles it may contain. Strive for a nice smooth surface.

Apply glue stick to a piece of 65# card stock, press the liner to the glued surface, and cover with a waxed sheet to protect the liner while burnishing.  Be sure the plain foil side is facing up! Burnish with a bone folder or brayer to secure the liner to the card stock. Note, the 65# card stock has enough body to give the liner stability, but not too heavy to get a good impression later when used in an embossing folder. Remove the wax sheet.


Rough cut the shape, trim to desired size, or cut out desired shape with a craft die.

Insert your foil creation into the embossing folder of your choice and run through your die cut machine.

Add Alcohol Ink to your creation if desired, dry with a Heat Tool, and add to your card creation.


by Marj Marion

Just for fun, challenge your card’s recipient to guess the source of the metallic layer!


by Marj Marion

Stop by the store on Recycled Rubber weekend to see the cards in person.

Recycled Rubber is this weekend, Saturday, September 3rd 10:00-5:00, and Sunday, September 4th 12:30-5:00. We have so many items in the sale, you do not want to miss it!

BONUS!!
MARJ WILL BE DEMO'ING AT RECYCLED RUBBER THIS SATURDAY!!

From 10:00 a.m. - 1:00 p.m. on Saturday, September 3rd, Marj will be here to demo a fabulous ink layering technique using the MISTI tool. This technique features Scenic stamping with color layering, pioneered by Virginia Liu and Jill Foster. This technique will blow you away! If you don't have a MISTI, we have just a few more in stock.

Five new Nuance colors are coming soon from Magenta. Here's a sneak peek!


 As soon as Helene gets back to Magenta from teaching classes at Art 'n Soul, she will begin production on these fabulous new colors, and they are perfect for Fall! We will be the first store to receive these, so if you want them (and you are going to want them) be sure to put in a paid pink sheet order to reserve your set.

You may have seen on Facebook or in our Newsletter, we received the larger size Tim Holtz Crazy Dogs! 


Tim Holtz Crazy Dogs by Stampers Anonymous

We have them in stock right now, so some in right away to get yours. The dies are supposed to be out later this month.