This week’s technique uses embossing paste to accentuate and
add dimension to watercolor painting.

To create this card select a stencil that creates an
outline. The example uses Magenta
Artist’s Flower, TM120. Unfortunately,
this stencil has been discontinued but we still have a few in the store. Other Magenta stencils that would work well
include Stylized Leaves (TM141); Bird (TM155); Dogwood (TM149) and Sunflower
(TM148.)

Begin by placing a 4.25” x 5.5” piece of Tim Holtz
Watercolor paper on your craft mat.
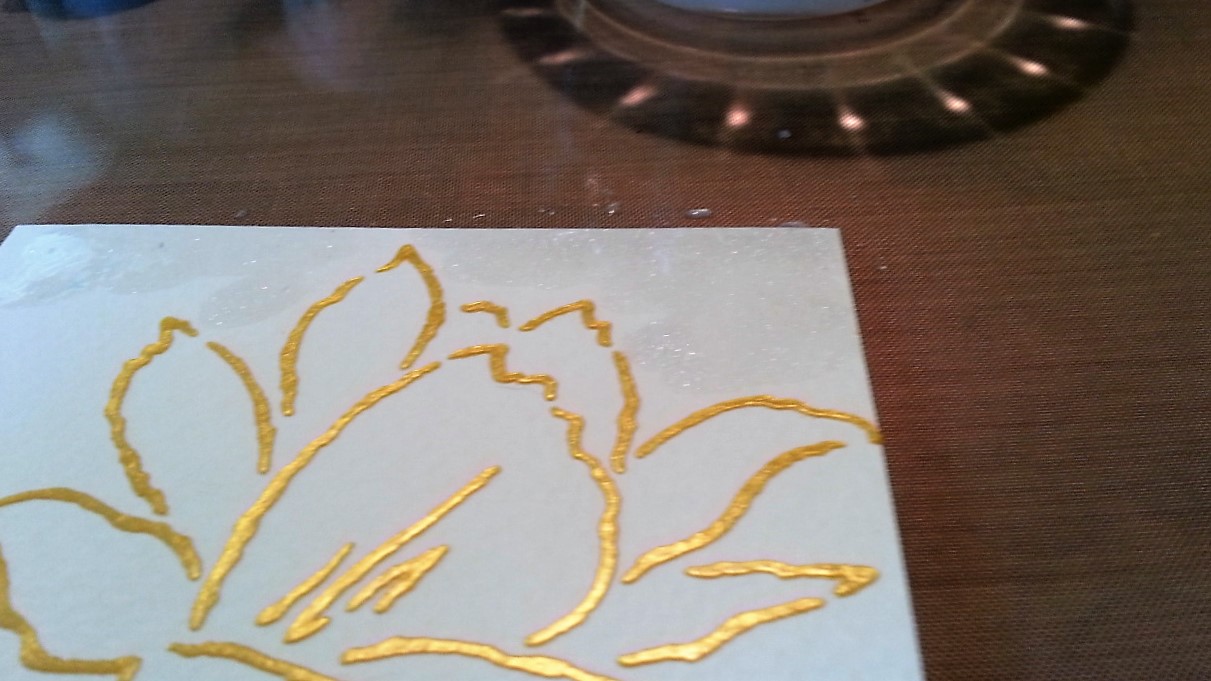
Place the stencil over the craft mat and tape it down so the stencil
doesn’t move around when you are applying the embossing paste. In my example I used Gold Metallic Imagine
Craft Creative Medium Embossing Paste but Dreamweaver Embossing paste will also
work.


Lift the stencil (the top piece of tape will act like a hinge and allow you to lift the stencil evenly from your work.) Remove the stencil and set your piece aside to dry for approximately an hour, depending on the thickness of the paste. Immediately wash the stencil and palette knife with warm water to remove the paste from your tools.

After the paste is completely dry you can begin painting. You will need small watercolor brushes, water mixed with Perfect Pearls powder (1/4 tsp to 2 oz. of water) in a small bowl or cup, regular water in a small bowl or cup, and Nuance. I painted the background first using Nuance colors of turquoise, cerulean blue and mauve; the leaves were done with grass green and jade; the flower was done with scarlet, hot pink and red. Sprinkle a bit of each color into a palette but DO NOT add water to the colors. You also need a cloth or paper towel to wipe your brush on as you paint.
Begin by using a paint brush to apply the Perfect Pearls water to a section of the background.

Pick up a bit of the dry turquoise powder with your paint brush and dab it on the wet watercolor paper. Keep adding more color and blend it over the wet area using dabbing motions. To add another color, rinse your brush in the regular water, dry the brush on the towel, and then dip it lightly in the Perfect Pearls water. Pick up a bit of the cerulean blue or mauve and apply it to the same section of the background and blend it with the turquoise using a dabbing motion.

As you finish one area, use your clean brush to apply more Perfect Pearls water in another section of the background. Then apply more color and blend until you get the result you want. If the colors are too dark, you can also dab the color off with a paper towel. If the color flows into the leaf or flower, you can also dab it off with a paper towel. When the background is complete, use a heat gun to dry it (or let it air dry.)


When the leaves are dry, paint the flower with the shades of red, again
leaving part of the petals lighter by blending out the color as if the sun was
shining on the flower.

When the flower is dry, use an embossing powder tool on the
lower right corner of the panel then stamp the Magenta sentiment “Think about
you often, care about you always” (07.954.G) with
VersaFine Vintage Sepia. Emboss with JudiKins Clear Detail embossing
powder. The panel was then cut to 4”x 5.25”, adhered to a panel of Beauty
Pink So Silk and then adhered to a panel of gold cardstock and finally adhered
to an A2 card.

You can see the finished card at the store, as well as the card shown above, created
with the Magenta Leaf stencil (TM141). Magenta has other stencils such as a bird (TM155), Dogwood (TM 149) and Sunflower (TM148) would also work well with this technique. The painting process goes more quickly than
it sounds, provides a great finished product, and is really fun to do. Paste several at a time, and you will have them to color when you wish. Using Perfect Pearls water, rather than
regular water with the painting, adds a lovely shimmer to the card too. I hope you will give it a try.
your technique offers stunning results! beautiful!
ReplyDeleteThank you for both the written instructions and then the step by step pictures on this blog. Beautiful technique! Can't wait to try.
ReplyDeleteCarolee 8:20 PM May 13