Friday, May 26, 2017

Technique of the Week: Stencils, Oxide Inks and Glitter! by Pam Nelson


This week’s technique uses the very popular Distress Oxide inks.  We continue to explore fun ways to use these inks and I’ve discovered that I love to use them with stencils because they blend so well!


To begin I cut a piece of watercolor paper to 4 ¼” x 5 ½” and colored it with Nuance colors of orange, yellow and hot pink.  I sprayed the paper with lots of water to really dilute the colors.  Then I blotted up the puddles of color with a paper towel.  I wanted the color to be light because I planned to stencil over the top.  I also colored a piece of scrap watercolor paper with these same Nuance colors for the sentiment tag on the front of the card.  I set the papers aside to dry but you could also dry them with a heat tool.


After it was dry, I taped the watercolor paper to my craft sheet and then taped Magenta Stencil TM100, Small Kiss Motif, over the top.  (Sadly this stencil has been discontinued but this technique will work well with lots of different stencils.)  


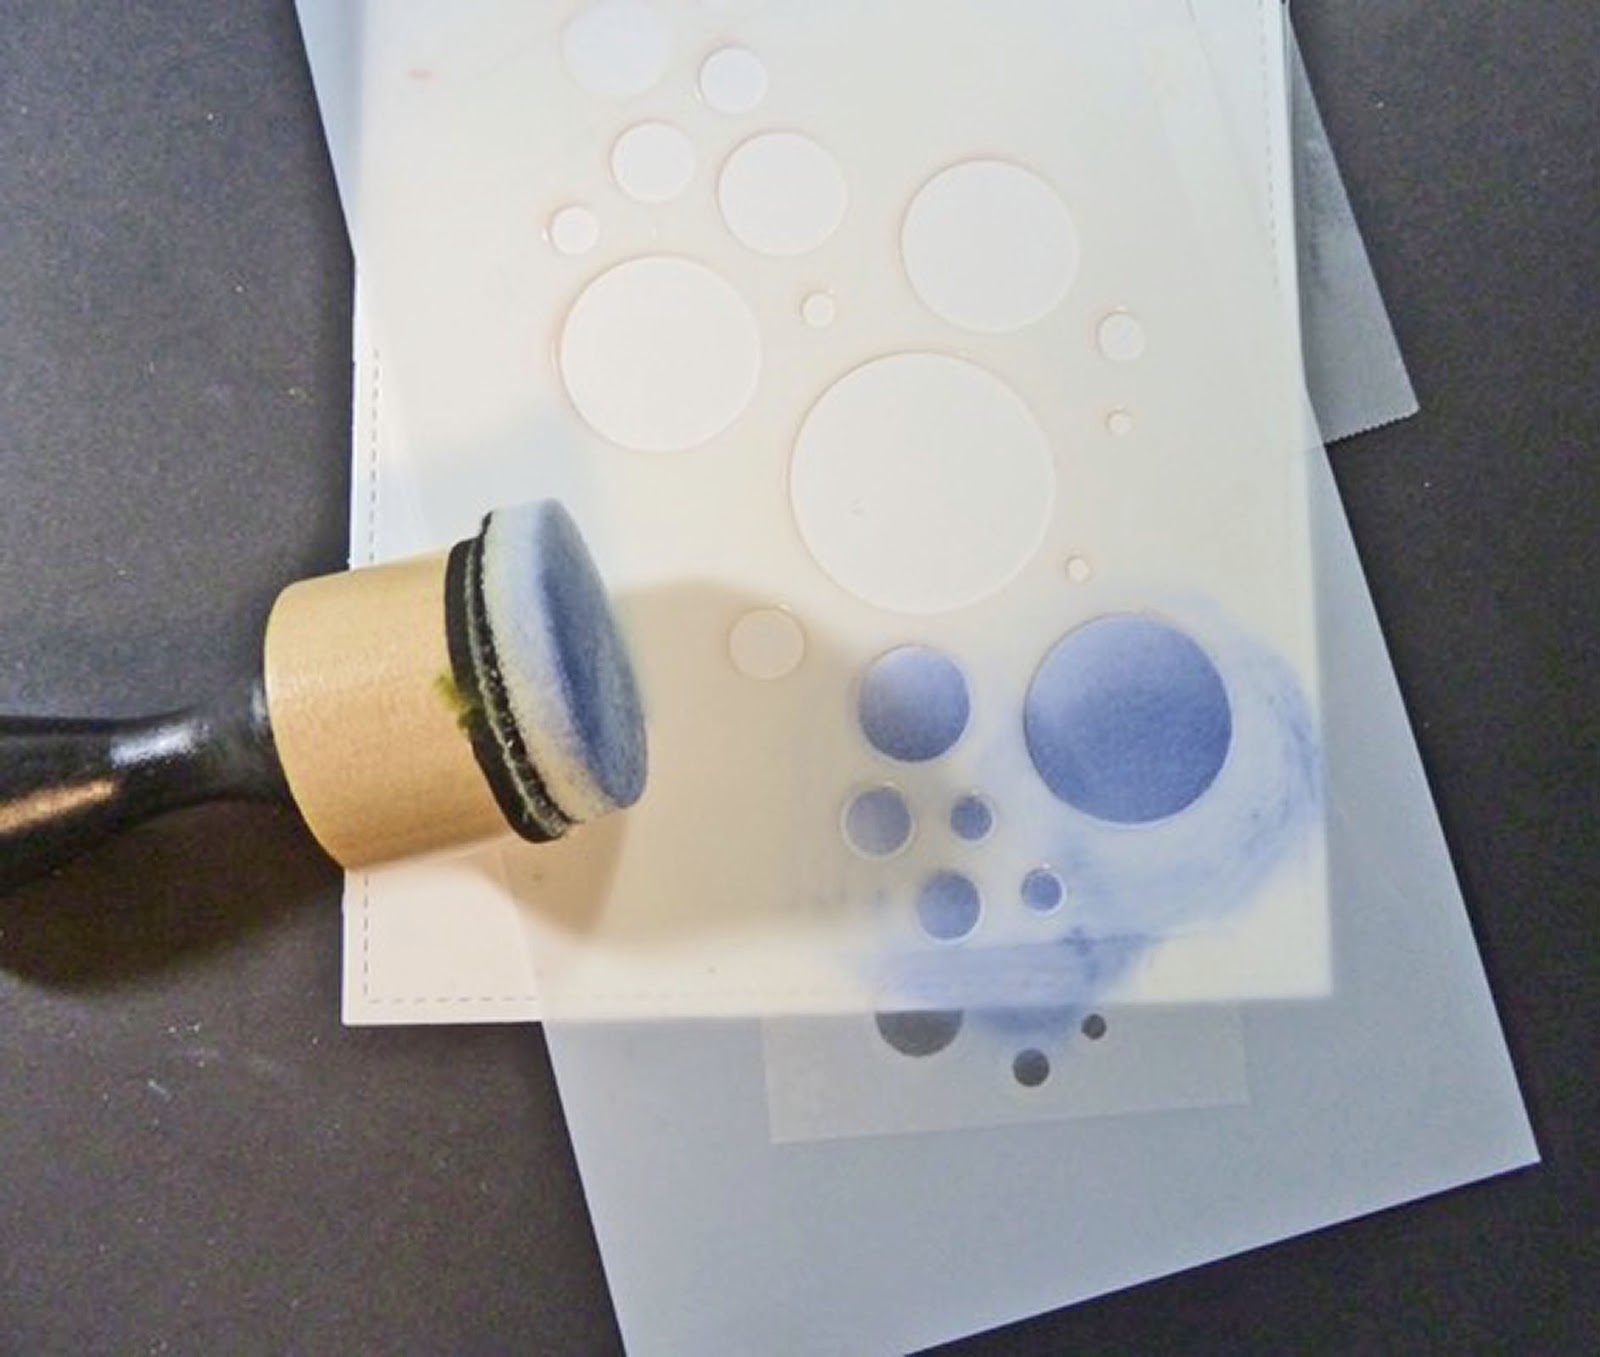
Using a finger dauber and the Dreamweaver Picasso Stencil and Masking tool, I applied Distress Oxide Cracked Pistachio ink onto the leaves and stems.  I added some Peeled Paint Oxide ink to add some shading to the leaves.  The Picasso tool has lots of curved edges that allow you to mask off parts of the flower while you apply the green ink to the leaves.  


I used Worn Lipstick and Orange Marmalade inks for the flower petals.  I again used the Picasso tool to mask off the leaves while I stenciled the flower petals.  I had originally planned to use Fired Brick instead of the Worn Lipstick but when I saw the final colors in my dried Nuance panel I changed my mind about the ink colors. 


Just for fun (and because I love sparkle on my cards), I sprayed the image lightly with Imagine Crafts Sheer Sparkle Shimmer Spritz.  I set the panel aside to dry but you could also use a heat gun to dry the inked image.


I re-taped the panel to the craft mat, put Magenta Stencil TM61, Circle Halftones, on top and taped it down.  I used a Dreamweaver Palette Knife to apply Dreamweaver Translucent Embossing Paste over the top of the stencil.  Hold the palette knife at a 45-degree angle to your paper as you apply the paste to avoid smearing the ink under your stencil.  Remove the tape from three sides of your stencil, leaving the tape on the top edge.  Lift the stencil up from the bottom edge and the remaining piece of tape will act as a hinge as you lift up the stencil.  Immediately rinse the embossing paste off the stencil. 


While the embossing paste is still wet, put the panel on a piece of wax paper.  Cover the entire piece with Elizabeth Craft Cool Diamond Silk Microfine Glitter. 


Tap off the excess and return it to the jar.  You can either set the panel aside to dry or you can heat it lightly and slowly with a heat gun.  Heating the panel will create small bubbles in the embossing paste as it dries (a technique called Molten Magic which you can read more about in a previous Technique of the Week here.) 


To finish the card I created an A2 size card from yellow card stock, then die cut a panel of green cardstock to 4” x 5 ¼” using the second largest die in the Hero Arts Infinity Nesting Rectangle Dies.  I adhered this to the front of the yellow card.  I cut the stenciled panel to 3 ¾” x 5” using the third largest die from this set.  I love this Hero Arts die set because my panels are always cut straight!

I stamped the Magenta “have a Beautiful day” sentiment on the scrap piece of Nuance with VersaFine Vintage Sepia and embossed with Judikins Clear Embossing powder.  I die cut it with the second smallest tag in the Poppy Stitched Mainstreet Tags (#1268), punched a hole near the top and used a piece of yellow ribbon to add it to the stenciled panel at an angle.  I cut a rectangle piece of fun foam, slightly smaller than the Nuance panel, adhered it to the back of the watercolor panel and then adhered it to the green panel on the card. 

The finished card is also on display at the store.  The photographs don’t really capture all of the sparkle from the glitter.


To create this sample, Oxide inks were applied through the stencil.  I removed the stencil and allowed the ink to dry.  I taped the cleaned stencil back over the image, taped it down and applied Translucent embossing paste through the stencil.  I removed the stencil the applied Elizabeth Craft Cool Diamond glitter over the paste.  After the paste was dry I colored the background by lightly applying Distress Oxide Fade Jeans with a foam applicator.


To create this sample I stamped Magenta Apple Blossom (14.655.P) and the sentiment with Onyx Black VersaFine Ink. I colored the image with watercolor pencils and lightly applied Tumbled Glass Distress ink to parts of the background.  I created a mask for both stamps and placed it over the stamped images then taped Magenta stencil Wavy Texture (TM222) over the top.  I applied Translucent embossing paste over the stencil, then removed the stencil and masks, and applied Elizabeth Craft Cool Diamond Glitter over the paste.

If you like Oxide inks but haven’t purchased them yet, we have a shipment arriving Wednesday, May 31st.   Drop by the store any time for a demo of this fun product and to reserve yours.  We are also receiving a HUGE order from our main supplier on Wednesday.  We’ll be calling everyone who has pre-orders but we’ll also have lots of fun items arriving with this order.

We just received a very few Hasty Lace Wreath templates. This is one of our most popular templates, and it works up so beautifully! These won't last long. If you don't know how to do Hasty Lace, please come in and see us today (Friday the 26th) or most Tuesdays and Wednesdays for a demo. It's easy and fun!

Hasty Lace Wreath card by Susie Tracy

Art 'n Soul will be closed on Sunday, May 28, and Monday, May 29 in observance of Memorial Day. Please come in and see us on Tuesday the 30th!

Friday, May 19, 2017

Technique of the Week: Fun With Oxide Inks by Marj Marion

We all seem to love the Oxide Inks, and here is a quick and fun card, which can be made with many variations.


by Marj Marion

I chose to use Bristol paper because it is super smooth and easy to sponge inks on the nice, smooth surface. For this card, I chose Oxide Faded Jeans, Oxide Spiced Marmalade, and Oxide Cracked Pistachio.


Die cut panel with Magenta TM179 Bubble Path Template

I die cut a panel of Bristol paper using the Lawn Fawn Large Stitched Rectangle dies, using the largest die in the set. You can use any rectangle die set and create a panel to your desired size, or cut your own rectangle with your paper trimmer.


I used Ranger Foam Applicators to apply the inks through Magenta Template 179-Bubble Path, and positioned the template so the bubbles appeared from upper left to lower right.  


I taped off some bubbles and just inked the ones that fit my panel.  I touched the foam to the ink pad, and then lightly touched it to a scrap paper to remove any excess ink.  You want a light application of ink to create nice even circles of ink, with no dark splotches.  


You can add more ink if you want darker circles. I removed and cleaned the template.


Next, I dipped the ends of my small paint brushes in some water, and dabbed droplets of water on the inked bubbles. To create tiny droplets, I dipped a toothpick in water and touched the water to the inked ares. To speed things along, I dried the water droplets with the Heat It embossing tool. The water reacted with the ink, and formed interesting water marks.

Panel shown with completed stamping; details below
When the panel was completely dry, I placed the cling Magenta Doodle Branch stamp on an acrylic block, 


and stamped the image twice with black Versafine ink. 


I arranged the Magenta word stamps  “Always”, “Be Happy”, and “Be Grateful” on my MISTi lid.   The strong magnets held my paper in the correct position, and the top edge of the triangle spacer allowed me to get a consistent angle on the two lower words. 


I stamped all three words in Versafine black ink at the same time using the MISTI.


To finish the card, I adhered my decorated panel onto a green panel, and then to a folded blue card. Using Ranger Multi Medium Matte, I adhered three sequins for a little extra “zing”.

Try this card layout using different colors of Oxide ink colors, and change up the images or words. 

Here is another tip!  If you really like an arrangement of multiple images or word stamps, and want to be able to re-create it later, make a template on card stock and keep it in a clear card sleeve.  Then, weeks or months later, just place your template in the Misti, and you can easily position your stamps in the exact placement of your original card design.

Here is a variation of this card design.  I used Oxide Inks in Broken China, Fossilized Amber and Wilted Violet, and instead of sequins, I tapped the ink pads on a craft sheet and added a spritz of water.  Then I dipped a small paint brush in the diluted ink, and splattered droplets on the panel.

by Marj Marion

Notice that I made three small dots with a Sharpie black marker after the word “Always”. I held the marker upright to get a nice round “dot” mark.

And, finally, here is another version using Magenta Flower C-0354.I , with more Oxide Inks in Spiced Marmalade, Worn Lipstick and Cracked Pistachio, and used the same ink splattering technique.  You will note that I used the same stamping of the words, as I had them attached on my Misti lid.  You can see that you can speed up your stamping of multiple card fronts by using a set arrangement of word stamps in your Misti.

by Marj Marion

Have fun using Oxide Inks along with stamps and templates and the MISTI!


Here are the supplies I used on this card:
  • Magenta: Doodle Branch C 37.286 J; Always C 07.875.F; Be Grateful C 07.840 E; Be Happy! C 07.653 E; Bubble Path Duo Template 179.
  • Lawn Fawn:  LF  767-Large Stitched Rectangles.
  • Ranger Oxide Distress Inks: Faded Jeans, Spiced Marmalade, Cracked Pistachio.
  • Tim Holtz Spritzer,Wood handled sponge Applicators, Heat Tool.
  • Standard MISTI, and Creative Corners Set.
  • Bristol Paper-100# , Versafine Black Ink, assorted sequins.


SaveSave

Thursday, May 11, 2017

Technique of the Week: Distress Oxide "Smooshing" by Dianne Johnson


You may have heard me say that I don't think you can do anything wrong with Distress Oxide inks. Honestly, I like everything I have done with these inks, and I have actually tried to mess it up (such a putting orange onto purple, or yellow onto blue); but nope! Still like what I have gotten. And they are SO MUCH FUN to play with! Oxide inks are a fusion of dye ink and pigment ink. The dye ink soaks into your paper and the pigment ink sits on top. This combination gives your finished product a matte, almost chalky look that is soft and beautiful. Blending Oxide inks is a dream, and they react with water even more interestingly than regular dye based Distress inks.


I have been playing a lot with blending Oxide inks, but I wanted to try smooshing with them. There are different types of what I would call "smooshing", which I would describe as getting wet ink onto your paper in a somewhat messy, unpredictable way. You could put the ink onto acetate or a piece of saran, and apply said inked plastic to your paper...

OR you could put ink on your work surface or craft mat, spray it with water to wet it and drag your paper into it. This second type is what I did for this card.

I assembled some oxide inks to apply to my craft mat: Wilted Violet, Broken China (my current favorite combo); then also Cracked Pistachio and, just to be a rebel, Fossilized Amber.

I started with Wilted Violet and Broken China, and rubbed them firmly onto my craft mat. I spritzed each one with pearly water (mix 2 oz water with 1/4 tsp Perfect Pearls powder).  I love how these inks look when you spray them. They bead up and look opaque. That's because of the pigment in them.

I used a piece of 5.5" x 4.25" Tim Holtz watercolor cardstock for this project, and placed it onto the ink on my mat and picked it up. Beautiful colors! I kept "smooshing" the color from my mat onto the watercolor cardstock, and I just love the combination of these colors.

I then dried the panel and cleaned my craft mat and added the Cracked Pistachio and then the Fossilized Amber colors and sprayed them. I placed my panel into the new colors and "
smooshed" it around. The colors beneath did re-activate somewhat, even though I had dried them. The result was that I got a little muddiness, but I actually really liked the effect.

I spritzed some water drops onto the panel and picked up some more of the ink from my mat. I was super happy with the colors on my panel, so I decided to make it into a card.

I cut my panel to 3.75" x 5" using the largest die from the Lawn Fawn Stitched Rectangle Stackables die LF768. I chose my Zen Dragonfly from Magenta (44.018.K - and yes, all Magenta stamps come in cling, so just put a "C" in front of the number for cling). I chose the "Have a Beautiful Day" sentiment stamp that I also designed for Magenta (07.969.F). I stamped both of these stamps with Versamark ink, using the MISTI stamping tool.

I embossed the stampings with White Diamond embossing powder from JudiKins. The panel was mounted onto a piece of So Silk Fair Blue cardstock and onto a base card of 110# Neenah Solar White cardstock. I added a few sequins and it was all done.

This was a VERY fast card to make, and you could use this background for almost any kind of card. We have the Zen Dragonfly and the "Have a Beautiful Day" stamps in stock at Art 'n Soul right now; and we will be ordering more of the fabulous Oxide inks very soon. Ranger has been super behind on orders for these inks, but they have really ramped up their production, so we are going to try again to get some in for you.


Thanks for hanging in there with me this far! If you want to see some more step by step photos, please visit my Backporch blog here.

If you have not seen this week's Newsletter, you can link to the latest one here. You can also see our store Calendar here.

Please take the time to scroll through the classes. There is a description and photo with each class. We have some fabulous teachers and classes coming up, including:
Linda Presley from Rosie's Roadshow this weekend!
Helene from Magenta May 21st and 22nd
Sally Penley May 27th
Terry Medaris June 10th (Including trunk show)
Linda Malcom from Lost Coast June 24th
Kae Pea from Rubbermoon July 31st and August 1st
This is a fabulous lineup, and we are working on even more! Please scroll through the class information, or better yet, come into the shop and look at the samples that we have.

If you are interested in taking a class, you can come by, or you can sign up by phone with your credit card. Just call us! Our contact information is at the top of this blog.

Journal Club meets today, May 12th, from 4:00 p.m. to 6:00 p.m.  This club meets the second Friday of every month and is open to all skill levels.  If you have been thinking about starting a journal or just want to learn more about this art form, stop in to check it out.  This is a great group where you can relax and work on a project while learning from others.   Even better, it's free!

Thursday, May 4, 2017

Technique of the Week: Prismacolor on Kraft by Dianne Johnson

This post is in conjunction with the Art 'n Soul newsletter article, "Technique of the Week"

This is really less a technique and more a reminder about how great coloring with Prismacolor pencils is on kraft paper. To me, coloring and blending seems easier, and colors seem more vibrant on kraft paper.


First I die cut a piece of kraft cardstock using the largest die from the Lawn Fawn Small Stitched Rectangle Stackables LF768. This makes a rectangle that is 5" x 3.75", with stitches all around. I chose the Zen Bouquet image that I designed for Magenta this Spring, 44.024.Q, and stamped it with Versafine Onyx Black ink.

I started coloring the largest blossom with PC926 Carmine Red and PC918 Orange. It was while I was coloring that I decided to try and add some foil embellishments to the centers of the blossoms. I almost didn't share this card because this created all sorts of difficulties.

I first tried to use a Quickie Glue pen. I have seen this pen work for this application in videos before, but it wasn't working for me. If you let the glue get a little dry and tacky, it works better. I ended up using some Sticky Stuff powder from Judikins and pressing the foil to the glue, with the pretty side up. 

The coloring part went much better for me, and I really enjoyed coloring and blending the colors. After coloring the largest blossoms, I changed to PC1003 Spanish Orange for the rest of the blossoms, with a little of the Orange blended in. For the leaves I used PC912 Apple Green and PC911 Olive Green. At the end, I added some white dots using a Uniball Broad white gel pen, and stamped the Magenta sentiment "You are awesome!" 07.966.D, in Versafine Onyx black ink.

I had some trouble deciding what to use to matt the panel, so I ended up taking a piece of Neenah Solar White 80# cardstock cut to 5.25" x 4", and rubbed Versamark ink all around the edges. I applied Judikins Gold embossing powder and embossed it to get a nice gold border around it, and I adhered my kraft panel to that and mounted it to a base card of Neenah Solar white 110# cardstock. I added a few sequins for some sparkle.

For additional pictures of this technique and a list of all the materials used, please visit my Backporch blog here.

If you want to learn more about coloring with Prismacolor pencils, Terry Medaris is coming to teach two classes in June. We may not be able to get Terry back to teach, so take advantage of this opportunity and sign up for his classes. You'll be glad you did! 


By Terry Medaris
Terry will also be bringing a limited trunk show which is open to everyone. For more information on Terry's classes and other classes at Art 'n Soul, please check out our latest newsletter here. Or our calendar here.

MINI CLASSES ARE HERE!!
We have been planning something really special for you, and Marj is going to get the ball rolling with a Mini Class! 


We thought of doing these classes after the amazing success of the 12 Tags of Christmas make and takes. We thought it would be fun to step it up a notch and do a card; plus teach you some tips and techniques that you can use on lots of other projects. Each Mini Class will be open for a window of 2-3 hours, and will be held like a make and take. These will occur on different days of the week or weekend, and different times. Come any time during the time period given, and you can make the card for that day. Most of the supplies will be provided, but we may ask you to bring some items like tape runner or other things to help you complete your card. If you're in a hurry, or are on a lunch break, you can always put the card together at home, but you will have time to at least do the top panel, learn a new technique and have fun! The cost will be $5.00 in cash or store credit only please, and given to the teacher (your $5 in store credit can be transferred to the teacher if you choose to use that; whoever is working at the register can help you). 

Marj will be doing the first one on May 15, 11:30 a.m. - 1:30 p.m. Come in any time during that 2 hours to make this beautiful card.