
This week’s technique shows you another way to add color to
your die cuts through watercoloring. I
used the Memory Box Graceful Cattails (#99574) die but there are lots of other
dies that will work for this technique, too.
I also used the Magenta “Vertical Happy Birthday” (07.968.H).

To get started I collected several supplies. In addition to the die you will need a round
1 ½” punch or a circle die of that size, some masking paper or a Post-it Super
Sticky Notes (these have adhesive on the entire square), Post it Tape other
tape such as blue painter’s tape for masking, a small bowl of clean water for rinsing
your brush and Distress inks (I’ll provide the names of the colors I used in
the instructions below.) I also used
“Pearly Water” for painting, which is a mixture of ¼ teaspoon of Perfect Pearls
to 2 ounces of water. I just sprayed a
bit into a small bowl. The pearly water
just adds a bit of shine to the painting but you can also use clear water.

To begin, cut a piece of watercolor paper to 4 1/8” x 5
3/8”. Die cut the Graceful Cattails from
one side, being sure to leave enough room for your sentiment stamp on the right
side. After cutting, leave the die on
your paper and put the stack of paper and die on your craft sheet. You want to leave all of the die cut
background pieces in tact so gently remove the die from the watercolor
paper. If a few pieces come out, just
put them back in place. Use the Post it
tape to tape around the edges of the die cut and anchor the paper to your craft
mat. I found that leaving the background
pieces in the die cut makes it easier to paint the fine stems and other parts
of the die cut.

To begin painting, smear a bit of Mustard Seed Distress Ink
and Wild Honey Distress ink on your craft mat.
Dip a small watercolor paintbrush in the pearly water, pick up a bit of
the Mustard Seed ink and then paint the rim of the sun. Rinse your brush in the clear water, dry your
brush on a towel, dip in the pearly water and pick up a bit of Wild Honey ink to
shade sections of the sun. Be sure to
rinse your brush in clear water each time so you don’t contaminate the pearly
water with ink. Next move to the grass and stems of the cattails and paint
using Twisted Citron, Mowed Lawn and Peeled Paint. Smear a bit of each of the colors on your
craft mat and paint all of the stems with the lightest color first, then add a
bit of each of the darker colors. You
want the stems of the cattails to be dark enough to stand out against the green
background you will be creating in the next step.

Finally, paint the cattails using a bit of
Wild Honey and Aged Mahogany. Set the
piece aside to dry.

When it is dry,
remove the tape and gently punch out the background pieces from the die cut.
 |
| If you look closely you can see the pencil marks at 2 o'clock and 8 o'clock on the sun |
The background piece for the die cut is also colored with
Distress Inks, using a foam applicator.
You will need a mask to ink the sun and then protect it when you create
the sky and ground. Use a punch or die
to cut a 1 ½” circle out of the center of the Post it note or a 3” x 3” piece
of masking paper.
 |
| Align the mask with the pencil mark so that the inner pencil marks are visible. |
Cut another piece of watercolor paper to 4” x 5 ¼”. Align your die cut on top of this and with a
pencil, gently mark the circle of the sun in two places on the inside and
outside of the die cut.

Place the mask over your piece of water color paper, using
the pencil marks as a guide (this is the square with the hole cut in the
center.) Using a foam applicator,
lightly apply Mustard Seed Distress Ink and then a bit of Wild Honey Distress
Ink for shading. Remove the mask and let
this dry for a couple of minutes (or use a heat gun to dry it.) Erase the outer pencil marks (the inner marks won't be visible any longer.

Put the circle from the center of the mask over the sun you
just colored. Use a foam applicator to
gently apply Tumbled Glass Distress Ink around the sun, blending it to about ½”
– 1” below the sun. You can also add
more shading with a light application of Broken China and/or Stormy Sky. (Try these on a scrap piece first to see if
you like the color.) Use the same method
to apply Twisted Citron and Mowed Lawn on the bottom section of the card. Begin at the bottom with Twisted Citron and
blend it up to the blue under the sun.
Add the darker Mowed Lawn at the bottom of the card. You want this to be lighter in color than the
green stems of your cattails.
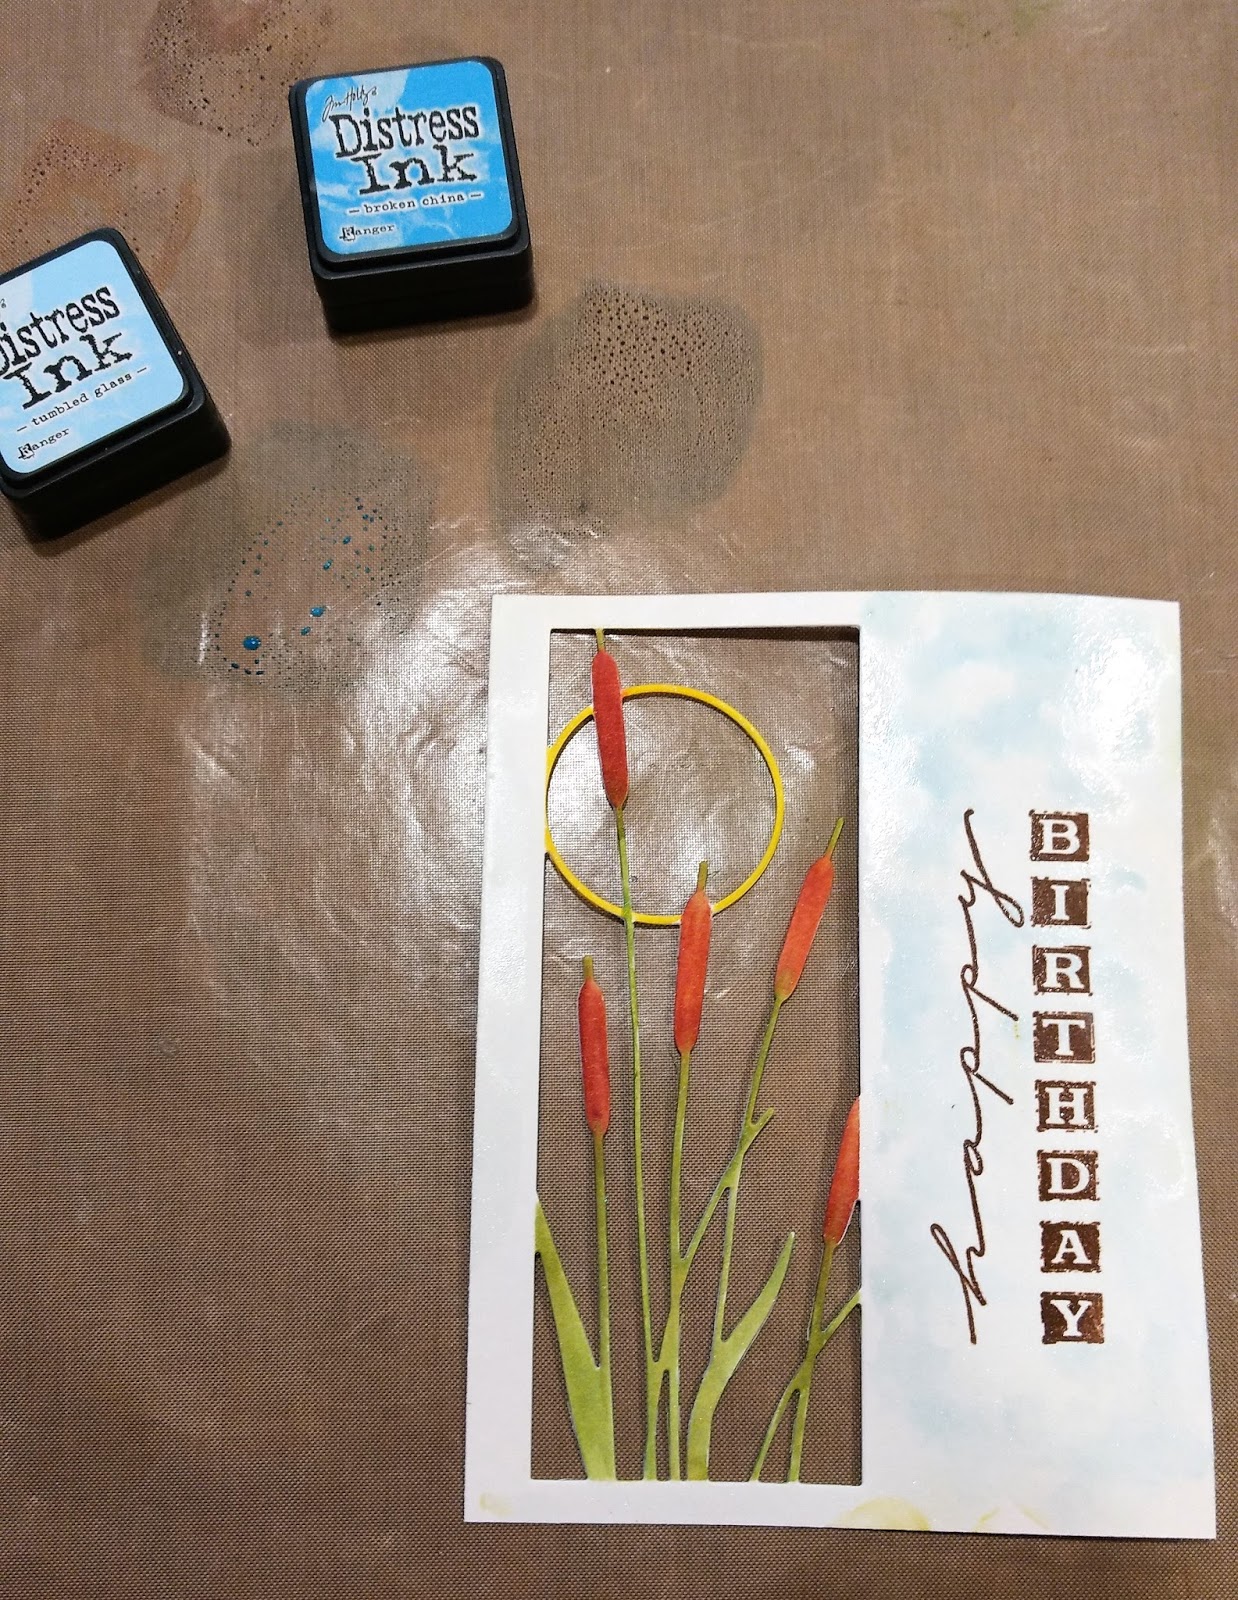
Move back to the die cut piece and stamp the Magenta
Vertical Happy Birthday next to the die cut using VersaFine Vintage Sepia and
emboss with Judikins Clear Detail Embossing Powder. Put more Tumbled Glass Distress Ink on your
craft mat. Use a medium size watercolor
brush to lightly paint the white areas of your die cut with pearly water, being
very careful not to touch the painted areas on your die cut as this will
reactivate the ink. Pick up a small
amount of the Tumbled Glass ink with your brush and dab it over the white
spaces. By “dabbing” rather than “brushing”
adds texture and interest to the background.
The water will help it blend – you can also dab up extra color with a
paper towel. Continue all over the front
of your card until it is the color and texture that you want. You can also drop in a bit of Broken China or
Stormy Sky ink if you want the background a bit darker. Set aside to dry.
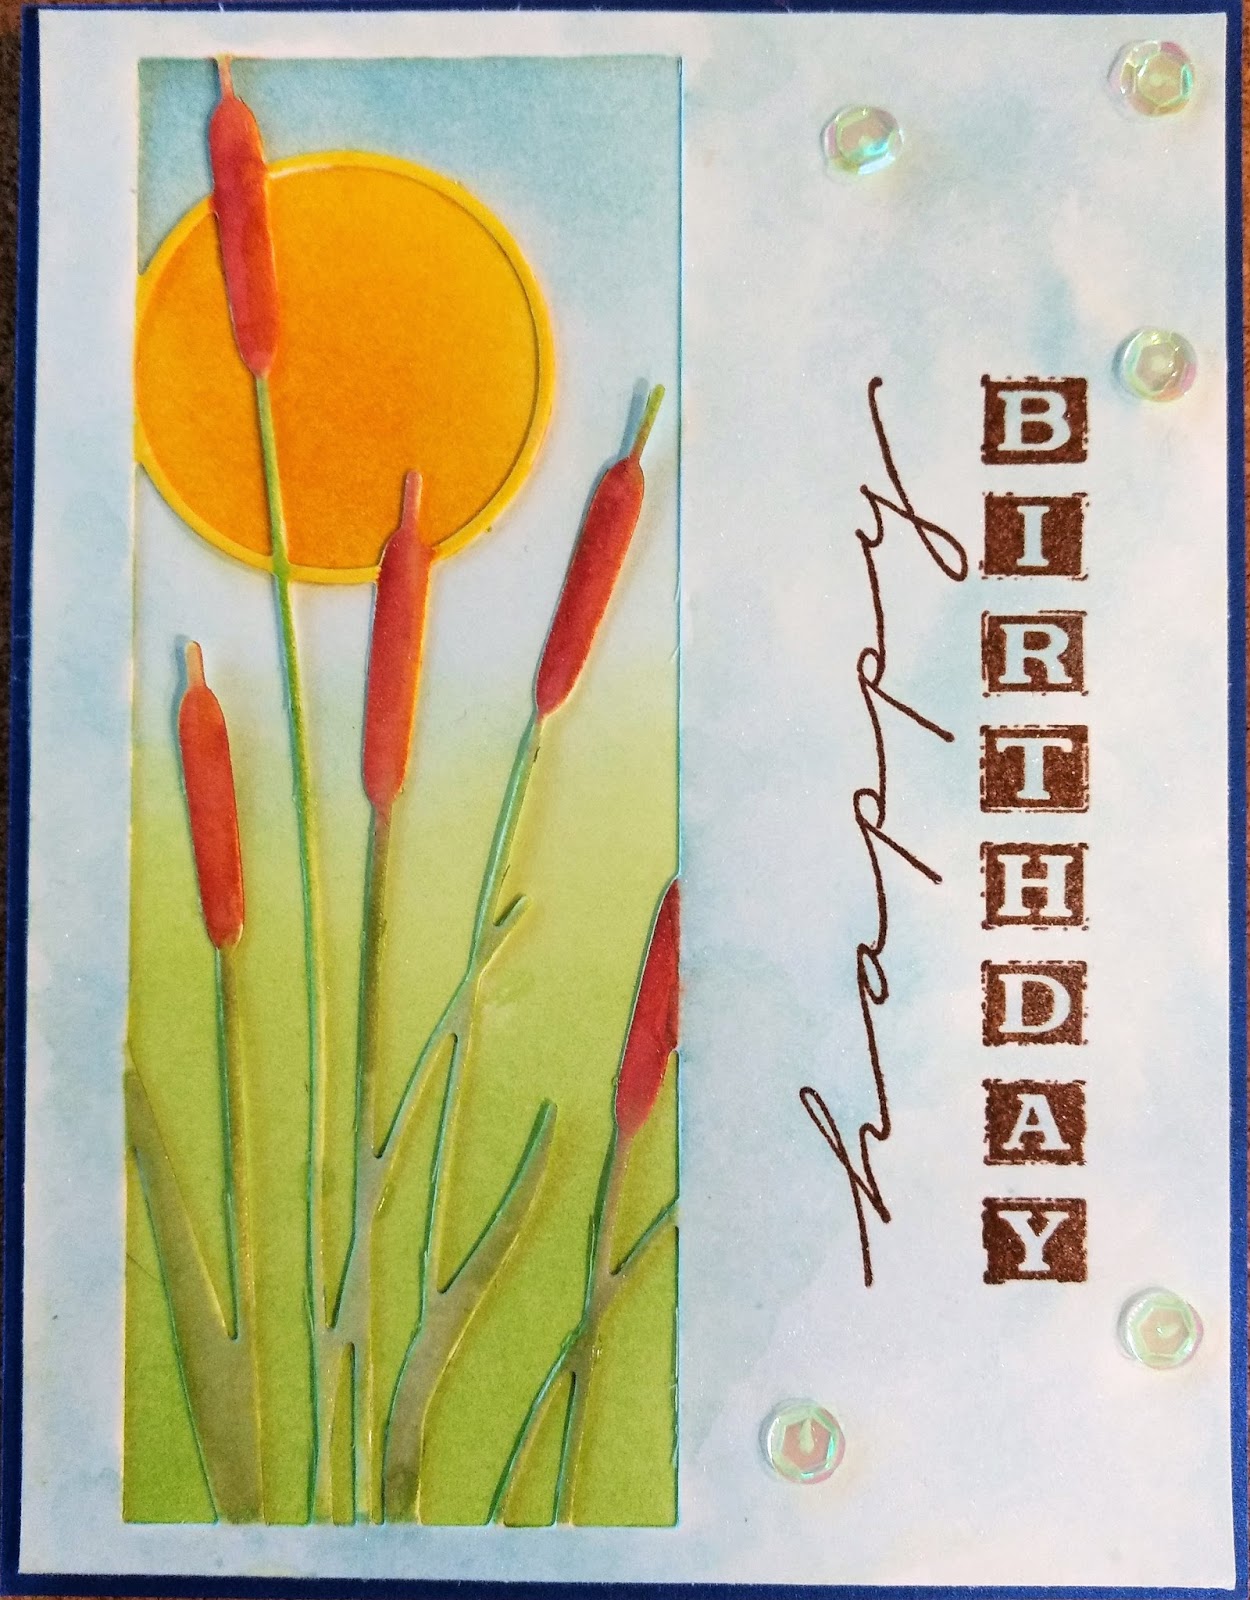
To assemble the card, adhere a piece of So Silk Fair Blue
paper, cut to 4 ¼” x 5 ½”, to the front of an A2 card. Line up the die cut with the background
watercolored piece and adhere together.
Adhere this piece to the front of the card. Add sequins using Ranger Matte Adhesive. I also like to put a drop of Pico Shimmer or
Clear Embellishment in the center of my sequins for another bit of shine.
This is a fun technique that would work well
with many die cuts, so I hope you will look at your stash of dies and try this
technique.
MINI CLASSES ARE HERE!
Beginning Monday, May 15th, Art 'n Soul will be starting a new class idea - Mini Classes! These classes will be held like a make and take, where we show you a new technique, and you go home with a finished card. Materials to make your card will be provided, but we may ask you to bring something to help finish it. You can come in any time during the given day and time period. The cost will be $5.00 cash (give to the teacher) or store credit (arrange this at the register). There's no need to pre-register, just drop in any time during the time period.
Marj will be getting the ball rolling with this beautiful card.

Come in on Monday, May 15, any time from 11:30 a.m. - 1:30 p.m. Please bring your double sided tape of choice (or tape runner) and your MISTI and MISTI corners, if you have them (If you don't have a MISTI or MISTI corners, they will be provided for you to use).
The Mini Classes won't be on a set day or time as we want to make them available to everyone so we'll schedule them on different days and times. Watch the weekly newsletter and Facebook for more Mini Classes in the future.
We also have lots of amazing classes scheduled for this Spring and Summer! If you have not already heard, Helene from Magenta is coming in May to teach a fabulous class showing you new techniques using stencils and Nuance. You do not want to miss this! Helene is not able to get here very often. Here is a sample of one of the beautiful cards you will make, and you will learn more tips about using stencils and Nuance.

You will learn how to make this gorgeous card with a beautifully ethereal and soft colored floral background You will learn techniques you can use over and over. This is one of four cards you will make! Helene will teach two sessions of this class, on Sunday May 21st, and Monday May 22nd.
Other amazing classes we have coming up include:
May 13: Rosie's Roadshow is here for a Birthday Card class. This class is almost full!
May 20: Sally Penley is back with another amazing class, "Vibrant Versals". Decorative capital letters...think someone's initial. Perfect tiny gifts. Takeaway - small framed verbal piece.
May 27: Sally will be back again to teach her very popular "Six Books in a Box" class. Basic bookmaking and six different, simple book structures. If you have always wanted to learn to make little books, this is the class for you.
In June we have Terry Medaris coming to teach coloring with Prismacolor pencils.
Also in June, Linda Malcolm of Lost Coast will be coming to teach a fun and quirky class "Altered Ancestors".
We are so excited to announce that in July, Kae Pea from Rubbermoon will be here to teach 3 classes!!
You can see more information, plus a photo for each class in our newsletter here. You can see an archive of all of our past newsletters, which include all of our very popular "Technique of the Week" articles here.
No comments:
Post a Comment
Thank you so much for taking the time to comment! Please visit us again soon.