Showing posts with label Technique of the Week. Show all posts

Sunday, October 15, 2017

Thank You Party Demo's Overview and More

Thank you so much to everyone who came to our Thank You party! We had so much fun, and we hope you all did also. Sue Moffat's cookies were very nearly all gone, and oh my gosh they were amazing!


It was wonderful to see you all, and thanks so much for all your good wishes. We will miss you too!


Thank you to Avanelle Hansen for the door prize stencils that we handed out randomly. Everyone who received one was thrilled.


Please continue to come and see us, we will still be at the shop through October 31st! We still have furniture and fixtures and a little product to sell. We have a few new things coming in our orders that have not already been sold.

Two of the smaller class tables are still available, as well as the large class table. Also some display tables, wall shelves and more! Come in and get a little piece of Art 'n Soul.

We have had such a great reaction to our demo's from the party on Saturday, so we wanted to post a few things for you to reference. The technique that Susie Tracy did at the party was well received and we have seen questions on Facebook, so we went looking for the Technique of the Week that Susie did back in 2015, which was before we had this blog. We have retrieved this article from one of our email newsletters, and we are re-printing it here. We are also going to provide you with links to both the Stampscapes catalog and a video by Kevin Nakagawa.


Technique of the Week: “TURNING WOOD INTO ART – THE EASY WAY!”…by Susie Tracy

You may have noticed a number of different samples at the store that have wood as the base – a couple of different books, some picture frames and some boxes, perhaps.  These are often admired and customers question how they are done. Well, the answer is “they are easy!!”  And now here is how they are done.  (As with so many things I learned how to do this from Helene at Magenta.) 


Make sure there is no dust on your wood product.  Using a felt applicator, color
 the wood with alcohol inks.  You can create a rainbow effect, or a sky and grass effect, or just choose whatever colors feel good to you at the moment.  It doesn’t take a lot of ink but you do want to completely cover the wood product.

When the piece is ENTIRELY DRY (and it this case I don’t recommend a heat tool because the wood can burn a little) stamp whatever you choose on the product.  I use black StāzOn ink.  When the ink is dry – which should occur quite quickly -- grab your Prismacolor pencils and start coloring the stamped image.  You can apply quite a lot of “pencil wax” for a fairly bright effect.  Generally, the pencil will cover up the alcohol ink color beneath it.  But even when it doesn’t, the subtle layering of colors is, I think, really pretty.  I typically use a lot of white pencil for accents and brightness.


Of course you don’t have to color at all.  You can just use the alcohol inks and when the wood is dry, you can stamp an image on top and call it DONE!


We have several examples throughout the store for your enjoyment and inspiration.


See – I told you it would be easy!


Now to share a bit more about Kevin Nakagawa, creator and owner of Stampscapes.  We were so happy to see many of you watch Kevin create his scenic masterpieces during the party on Saturday.  


Kevin has a wealth of information available on his website which you can find here. In the future, you can order his stamps directly from him. His website also has lots of videos on a variety of topics - everything from ideas for combining specific stamps and stamp sets, to a variety of techniques for shading, adding color, creating skylines, bodies of water and so much more.  From the Stampscapes Home page, click on "Lessons" to see his videos.  The videos are also available on YouTube.  


One of Stampscapes most popular stamps is "Lakeside Cove", (049G).  For even more inspiration, you can find several videos using this popular stamp in a variety of ways here. 


Friday, August 18, 2017

Technique of the Week: "Love to Label" by Marj Marion

As an avid stamper and paper artist, I find it helpful (essential?!) to have lots of labels for my art supplies. And, yes, you might call me an organization guru, but for me it’s fun and satisfying to have my supplies labeled so I can easily see them and find what I want to use. This week, I’m sharing some labeling ideas for Nuance, Distress Oxide ink pads and Distress Ink refills.


NUANCE:
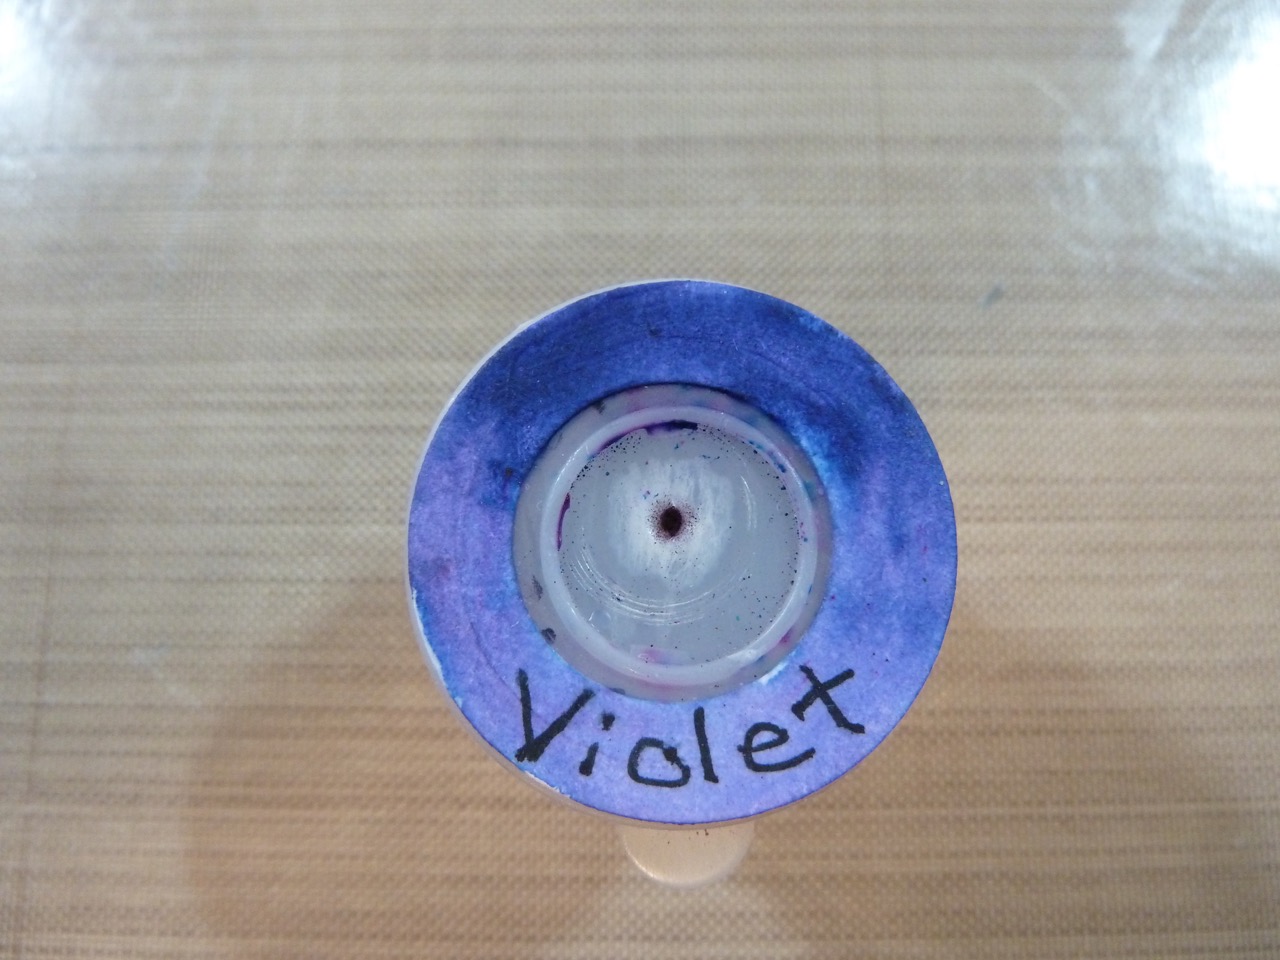
I’ve noticed that with frequent use of my Nuance containers the small colored labels in the center of the lid seem to pop off. I like labels with the actual color of the product, so I experimented with various circles to make watercolor labels for all my Nuance colors. My best solution was to use two circle punchesL a 5/8” and a 1-1/8” punch. Another idea is to use two small circles from your nesting circle die sets.

I created some Nuance watercolor “paint” in my palette, and painted 1-1/2” circles of each color on 90# watercolor card stock. (The 90# paper is easier to punch than our usual 140# watercolor paper.) I painted one side of the circle a bit darker, to show the Nuance color both in light and dark shades.


This photo shows how I made two shades of the same color on the ring.
You can always add a little more paint to achieve the two shades of your colored ring.

My next step was to punch a 5/8” circle in the middle of each of my large painted circles. You can use the punch outs in one of your creations!

This photo shows the 5/8” punch right side up.


Next, I held the 1-1/8” punch upside down so I could center the small hole created in step one in the middle of the opening of this larger punch. By centering the small hole and holding the paper carefully, I created an open ring as I punched this larger circle. Viola!  Nice rings for labels for the Nuance jars.


You can also just punch out the rings, and THEN paint them, but I found it’s a little more fussy that way.

I dabbed Multi Medium Matte around the edge of the Nuance lid, and then pressed my colored ring onto the Medium.  I covered it with a small piece of waxed sheet, and pressed firmly to securely attach the ring label to the lid.  I set the jars aside to dry thoroughly.


The photo at the top of this post shows my finished labels. I printed the appropriate name of the Nuance color on each ring. I love being able to look at the true colors on my labels as I am choosing which colors to choose for my projects.

DISTRESS OXIDE INK PADS
I rarely store my ink pads upside down, but after I attached velcro pieces to attach the foam circles on the underside of my Distress ink pads, they didn’t slide in and out on my shelves so well. So, I do store these pads upside down, with a label showing the name of the color, and a swipe of the actual color of the ink. I attached them to the side of the pads, and covered them with a strip of packing tape to keep the label nice and clean. Now I can see the actual color of the ink, easily see the name of the color, and the pad slides in and out of the shelf smoothly.


DISTRESS INK REFILL BOTTLES:
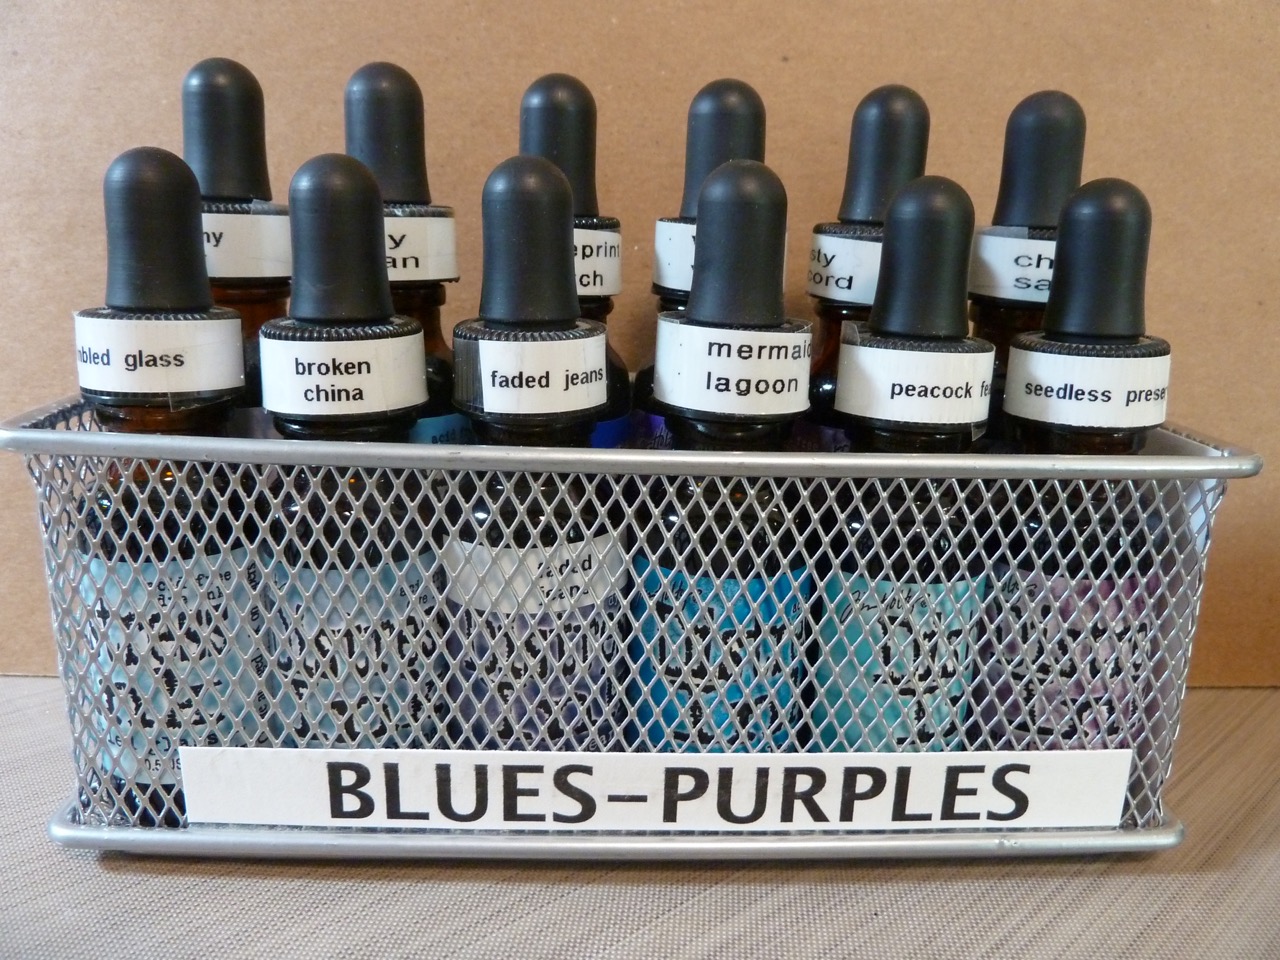
I’ve tried a few different containers for my Distress re-inkers, but the printed ink name on the bottom of the bottle always seems to be hidden by the container. I printed the names of all the re-inkers, and attached them to the black plastic rim on the bottle top. I secured the label on the rim with packing tapes. I found these mesh boxes at the Container Store, and they are magnetic, so they attach to my file cabinet making access very handy!  I cut some sturdy foam pieces to allow the back row of re-inkers to be raised for better visibility. I have the re-inkers grouped by major colors, and I am enjoying the easy access to my re-inkers now.


If you have some clever methods of labeling art supplies, please share them with us at Art ’n Soul!


CLASSES!!

Lynell Harlow, founding member of Dreamweaver Stencils will be with us this weekend, teaching 4 fabulous classes. There are a few spots left in these classes, so do yourself a favor and call us and sign up!


Friday, August 18th, 10:30 a.m. – 1:00 p.m. "COLOR YOUR STENTANGLE CREATIONS – Lynell & Wayne Harlow $35
Lynell and Wayne Harlow are back with the easiest of tangle patterns. Lynell will lead the way for those of you who are a bit overwhelmed with creating patterns. She has chosen the simplest pattern she can think of called ‘Brella and used her grid stencil to further simplify the tangling process. Wayne is a Certified Zentangle Teacher, and will be there to assist and help with the nuances of shading and coloring your creations. This class is meant to be fun so bring your favorite colored pencils from home if you have some. The store has some Prisma Color pencils, but it is always nice to use what you have at home so the teachers can give you clear directions for your own materials.
 Also please bring your Basic Kit, a Micron 01 black pen or equivalent, and a pencil.


Friday, August 18th, 2:00 p.m. – 4:30 p.m. "SIMPLE PLEASURES/INK TRANSFER ETC. – Lynell Harlow $35
Sometimes the simplest stenciling techniques are the most effective AND the most fun. If you don’t mind inky fingers here are some stenciling ideas that are sure to delight. Ink transfer is one of the easiest ways to achieve motion using metal stencils and digital card stock. Next you will have the opportunity to clean up these prints with three different yet very simple embossing paste techniques…silhouettes, sculpting and metallic paste with glitter. If you are new to metal stencils you will realize that this is an opportunity to add something colorful to your card making repertoire. If you are an advanced stenciler you will see the ease of these techniques for making multiple card designs very quickly. Come join Lynell Harlow, former owner of Dreamweaver Stencils as she returns to the Northwest for a weekend of stencil magic.
 Please bring your Basic Kit.


Saturday, August 19th, 10:30 a.m. – 1:00 p.m. "LETTERPRESS WITH METAL STENCILS – Lynell Harlow $35
Bring your Big Shot or Cuttlebug with plates and learn this letterpress printing technique using Memories Mist Sprays and the new Oxide Distress ink pads. Lynell did a quick demonstration of this technique for one of her classes when she was here in the Spring, but this is your opportunity to use metal stencils under her tutelage. Please also bring your basic kit and a Stamping Details thick mat if you have one.


Saturday, August 19th, 2:00 p.m. – 4:30 p.m. "A GLASSY CHRISTMAS – Lynell Harlow $35Cracked Glass was a very popular class by Lynell this Spring, so this time the emphasis is on Glass with a Holiday twist. Learn the technique so you’ll have a head start getting those Merry cards done early. Use metal stencils and all sorts of mediums to achieve these creative results, embossing paste, thick embossing enamel, snowy embossing powder, and a variety of inks are a few of the materials you will be working with. Please bring your Basic Kit, small stencil brushes and a Picasso stencil if you have one.
This class will be repeated on Sunday, August 20th
Sunday, August 20th, 1:00 p.m. – 3:30 p.m. "A GLASSY CHRISTMAS – Lynell Harlow $35

Thursday, August 10, 2017

Technique of the Week: Adding Shine with Gilding Flakes by Pam Nelson


This week’s Technique of the Week features a new product by Nuvo – Gilding Flakes.  These beautiful flakes will add lots of shine to your cards.  I decided to pair these flakes with one of the new dies from the Memory Box Holiday catalog.


To begin I cut a piece of Lapis Blue Stardream paper to 4” x 5 ¼” and used the new Memory Box Batavia Channel Die (#99815) to die cut the left side of the paper.  I prepared the surface with a powder tool, used Versamark to stamp the Magenta Multilingual Merry Christmas sentiment and then embossed it with White Diamond embossing powder.
 

The Nuvo Gilding Flakes come in three colors – Radiant Gold, Silver Bullion and Sunkissed Copper.  There are a lot of flakes packed into each of these jars so they will last a long, long time.  Before you begin using the flakes, I recommend you place your card panel in some type of container or plastic tub and then begin applying the flakes.  You can store the unused flakes in this tub or empty them back into the jar.  Because the flakes are so lightweight they move around easily - don’t do this technique near a fan!  A little hand vacuum or Swiffer cloth works great for clean-up. 


To add the flakes to the die cut, I first applied a strip of 2” wide Scor-Tape to the back of the die cut area.  Place the card front, adhesive side up, in the bottom of a plastic container.  


I began putting some Silver Bullion Gilding Flakes onto the adhesive area – just place the flakes onto the adhesive and press lightly.  You can also mix colors of the gilding flakes, just add the colors that you want.  


When the entire adhesive area is well covered, (and while the card front it still in the plastic container), begin burnishing it with your finger to remove the excess flakes. 


I also like to use the back side of a piece of Ranger Cut-N-Dry Foam to burnish the flakes until you have a smooth surface.  You can also use a stencil brush to burnish the gilding flakes – just use the brush in a circular motion and brush away the excess flakes.  


When complete, wipe the card front with a Swiffer cloth to remove the little excess bits of foil.


To create the background piece for layering, cut a piece of white cardstock to 4 ½” x 5 ¼”.   Apply ¼” Scor-Tape on the outer border of the rectangle.  


Remove the release sheet from the tape, place it in the piece in the plastic bin and cover with the silver gilding flakes.  


Follow the same steps to burnish the foil (including the edges.) 


To finish the card, cut a piece of fun foam to slightly smaller than the Lapis Blue card front.  Remove the Scor-Tape release paper on the back of the die cut, add adhesive to the rest of the card, and then adhere to the fun foam.  Apply more adhesive to the back of the fun foam and then center it on the background piece.  Adhere the whole piece to A2 card. 

I added some sequins for interest and placed a drop of Nuvo White Blizzard Glitter Drops in the center of each sequin.  

I think this would be a great technique for “production” cards.  Once you start using these flakes you won’t want to stop so why not do several cards at one time?

You can see this card in person at Art ‘n Soul so I hope you will stop by to see it.  My photography skills just don’t capture the shine from these flakes.  Stay tuned for future Techniques using this beautiful new product. 

Friday, August 4, 2017

Technique of the Week: Nuance Spin Art by Dianne Johnson

One of our customers at Art 'n Soul, Sue Wright, brought this technique to me, and agreed to let me use it for Technique of the Week. Sue brought in a salad spinner and we made some backgrounds then and there.


This is a perfect fun art project for kids and grandkids. It's fun and the mess is contained pretty well.

It's a good idea to obtain a used salad spinner from the local thrift store. I preferred not to use the salad spinner that I use for food. Some of the spinners don't have an enclosed bottom to them. If you get one like this, you can place it onto a paper plate or bowl so that the mess would be contained.

To begin, Sue said to get some poster putty, make a donut from it, and place it in the center of the spinner basket. This serves two purposes: first it levels the center which usually has a small bump; second is that when you place your watercolor cardstock into the basket, it will stick down to the putty.

In playing with this technique, I used several different papers, including Bristol and Strathmore watercolor paper. I liked how the color moved the best with the Tim Holtz watercolor cardstock.

I tapped Nuance powder onto the cardstock after placing it into the basket and pressing it down not the putty. I then sprayed the cardstock liberally with water. You can use plain water, or water mixed with Perfect Pearls powder.

I put the top on the spinner quickly and spun it as fast as I could.
The pattern that I got at first was pretty, but I wanted a little more color in the center. I tapped more of the Scarlet Nuance into the center, sprayed and spun it again.

I love how it turned out! I like how you can keep adding powder, spraying and spinning until you get something you really like. The panel said "celebrate" to me.

To make my card, I let it dry naturally, although you could hurry the drying with a heat tool. I die cut the panel with the Die-namics MFT-483 Blueprints 13 die. I stamped the Magenta Graceful Poppies stamp and the Happy Birthday sentiment with Versafine Onyx Black ink. To accentuate the "celebrate" look of the card, I stamped the Magenta Flowery Ink Spot stamp several times on the panel with Distress Barn Door ink.

I mounted the panel onto a piece of Black So Silk cardstock and then adhered it to a base card of Neenah Solar White 110# cardstock.

I shared this technique with the staff, and we got together and had a great deal of fun spraying and spinning.
One of the things I did when the staff got together to make these is to wipe out the spinners on many of the staff's panels with paper towels. I got beautiful paper towels from this.
Some of you may remember what I do with beautifully colored paper towels. You can make gorgeous  patterned cardstock with these. You can look at how to do this here on my blog on a technique called Upcycled Paper Towel.

I made another card with a second piece that I made with blues and purples. This time I used a Memory Box die, Snowy Cabin 99785. LOVE this little die! If you want one, be sure to order it soon because our catalog sale will only be open a little longer.


For the sentiment I used a favorite Magenta stamp, 07.457.H Peace on Earth.

For full details and materials lists on both cards, as well as step by step photos, please visit my Backporch blog here.

What's New at Art 'n Soul:
IT'S RECYCLED RUBBER WEEKEND THIS WEEKEND!! Come in out of the heat and smog and spend some time at Art 'n Soul scooping up on some amazing bargains! We have seen so much great stuff come in, including a massive tower of Stampin Up inks, lots of dies, punches and stamps, including some really good, barely used cling stamps that you will love! We have heard rumors that someone is bringing in some card racks and House Mouse stamps also. You do not want to miss this Recycled Rubber sale!

The first 25 of the Tim Holtz platforms are due to be delivered to us today. If you are one of the lucky first 25, you will be called when they arrive. We are ordering more! If you don't have to have it immediately, please order through us. We also want to thank all of you who have ordered the platforms and other new items through us. We know that some people may have been able to get them faster from an online company. We can't compete with them, and really appreciate your loyalty and patience more than you know. You keep us going!

The Memory Box and Poppy catalogs were opened in conjunction with Pam's mini class on July 30, and will stay open only a short time longer, so make your lists and order with us. Their new collection includes many Holiday dies. You can see them online here and here.

We are looking forward to the Sally Penley Holiday Mini Masterpiece classes on August 12. These classes are full, and if you missed your chance to get it, please go ahead and sign up on the wait list. You never know what might happen, and you may be able to get in. It doesn't cost anything to get on the wait list.


If you did not receive our newsletter this week, you can access the latest newsletter here and our calendar here. Be sure to check out all of the upcoming classes! Lynell Harlow, founding member of Dreamweaver Stencils will be here teaching 4 different fabulous classes on the 18th, 19th, and 20th. These are always a hit! 

Linda Presley of Rosie's Roadshow will also be here in September with a new and completely adorable class for you.

Thursday, July 27, 2017

Technique of the Week: "Score" with Solid Stamps by Marj Marion

This technique was shared with me by Sue Moffat, former staff member and a great friend of Art ’n Soul and me!  Thanks, Sue, for letting me share it in our weekly email and on our blog.

Supplies:  Nice, smooth card stock, a Score Board Tool, solid style rubber stamps, Distress Oxide Inks and assorted embossing powders and bling.

by Marj Marion

Step 1.  Place your cardstock in a scoring tool (I like the Martha Stewart ones, either large or small). 


For this first sample, I chose to score every 3/4”……both horizontally and vertically.


Step 2.  Place your scored cardstock in your MISTI with the score lines that are “depressed” facing up. Position your solid stamp in one corner, and ink up with desired Oxide ink. Press somewhat firmly to transfer the ink, but not TOO hard. You want the ink to show in the resulting raised “squares” between your score lines, but if you press too hard, the ink will sink down into the depressed score lines, and you want these score lines to remain un-inked.


Step 3.  Repeat the stamping if you need more ink for a complete image; don’t press harder, just add more ink. Then, clean the stamp, and repeatedly reposition it so you cover the entire scored card stock panel with stamped images. It’s fun to use a wide variety of inks, and use your creativity in selecting your colors.

Step 4.  Trim your panel to fit your desired card size, and stamp a message in coordinating ink if you want a message on your card. Mount your decorated panel to a coordinating colored panel, and then to your card, add your message, and a ribbon if desired. You will love the silk ribbons at Art ’n Soul because you can add a bow without a lot of bulk.

I used Magenta 07.700 G —“Life is Art” and Magenta C 42.111K—Solid Roses in this first card.

Step 5.  You can vary this technique by scoring your paper with different widths……and make even or uneven measurements between your score lines.

by Marj Marion

This card shows uneven scoring, with Magenta CL 0354 I —flower, and Magenta 21.036 B—Bubble for the circle over-stamped in the middle of the flowers. All inks were Distress Oxide. The small pink dots were made by pressing the end of a poker tool in ink, and “stamping” with it. If you ink your stamps well, you can do this technique without a MISTI…..just apply lots of ink from a well inked pad, and press with medium pressure.

by Marj Marion

Step 6. The above example shows a 3/4” even scoring pattern,  Magenta 85.012 K —Solid flower with Abandoned Coral Oxide ink, embossed with clear powder. I added black sparkle sticker paper die cut with Hero Arts DC 151 Stamp and Cut, and stars cut with a hand held punch.  A double bow of twine adds more interest.

by Marj Marion

Step 7. My last sample shows 1”  even scoring, with Magenta 41.073 J—Branch Silhouette.  I used Twisted Citron Oxide ink and embossed with Judikins Iridescent Sparkle Embossing Powder.  The little flower stamp is Magenta C 0616 B, stamped with assorted Oxide inks.

Have fun with this technique, and bring in your creations to show us!

What's New at Art 'n Soul

Pam's mini class is almost here!!

Sunday, July 30th, 1:00 p.m. - 4:00 p.m. "MINI CLASS - CHRISTMAS IN JULY” – Pam Nelson $5 cash or store credit

by Pam Nelson

Do you want to get an early start on your holiday cards? Drop by the store any time between 1:00 p.m. and 4:00 p.m. to make this fun card featuring a new die from Memory Box’s holiday release. Pam will show you how to use two colors of glitter to make a shiny, yet easy, card. Please bring your double sided adhesive and fine tip glue applicator, if you have them.
We will be opening the Memory Box/Poppy catalog in conjunction with this class! The newest collection from Memory Box and Poppy is Holiday and Christmas, and there are some beautiful new dies that you are going to love!

Ranger is finally shipping our first order of the Tim Holtz platforms! They are in New Jersey, so it will be about a week before we receive them, and we are so excited to finally get these into our hands. Unfortunately we have sold all of the initial ones we ordered, but we will be ordering more. If you don't have to have it immediately, please order through us.
 
We also want to thank all of you who have ordered the platforms and other new items through us. We know that some people may have been able to get them faster from an online company. We can't compete with them, and really appreciate your loyalty and patience more than you know. You keep us going!

Rubber Moon will be here on Monday and Tuesday!

There are still some spots left in Kae Pea's classes. Come by and see the samples in person and sign up, or sign up by phone with your credit card.


Monday, July 31st, 10:30 a.m. - 1:30 p.m. "STENCIL pARTy!" – Kae Pea of Rubbermoon $50
Photo is not necessarily exact creation you will make, but is representative of techniques you will use.

by Kae Pea

Explore a myriad of stencil, stamp and mixed media techniques to create awesome journal pages and canvas or paper paintings. We will create numerous pages and one 8 x 10 canvas. NEW CLASS! 

Monday, July 31st, 2:30 p.m. - 5:30 p.m. "ART ON THE BLOCK" – Kae Pea of Rubbermoon $50
Photo is not necessarily exact creation you will make, but is representative of techniques you will use.
by Kae Pea
In this super fun class we will create some wonderful pieces of art using wood blocks as a substrate. Not only will we be using recycled Materials, We will be playing with a variety of Mediums, Including paper collage, acrylic paint, Gesso, inks and Stamps. This class will give you the knowledge and tons of inspiring ideas for future projects too!

Tuesday, August 1st, 10:30 a.m. - 2:30 p.m. "LET’S PAINT THE TOWN" – Kae Pea of Rubbermoon $65
Photo is not necessarily exact creation you will make, but is representative of techniques you will use.
by Kae Pea

by Kae Pea
In this awesome class we will use stamps, magazine pages and gel prints to create amazing collaged cityscapes full of whimsy and wonder. We will work on flat panel or board to create an 8 x10 piece. NEW CLASS
Student supplies for Rubbermoon classes: Basic kit including scissors and pencil; Paintbrushes (recommend brushes that are good for mixed media #6 or#8 round and #12 or #14 bright); Tim Holtz collage brush 1.25"; Brayer; Black and/or Grey Archival ink pad; a few colors of acrylic paints* (student grade tube acrylics such as Liquitex basics, NOT Fluid or high flow); a few Pan Pastels*; a few colors of radiant watercolor concentrates*; A couple of black Micron Pens (.02 recommended); Black Sharpie fine; paper towels; baby wipes; water spray bottle. *note: Kae Pea will be bringing items to share, but it helps if each student has a few of their own to cut down on sharing time and also so that you have your favorite colors to use.

Don't forget that next weekend, August 5th and August 6th are the next Recycled Rubber weekend! The last day to bring things in for the sale is Wednesday, August 2nd. We have a link at the top of this blog for our Recycled Rubber guidelines if you are interested in bringing things in for the sale, and have not done so before.
We have heard that someone is going to bring in some card racks, and also House Mouse stamps. We are amazed at how much has already been brought in. It's going to be a big one, so don't miss it!

To see the latest copy of our newsletter, please click here. To see our calendar, please click here.

Friday, July 14, 2017

Technique of the Week: Easy Inlay by Dianne Johnson


I got the idea for this technique from Jennifer McGuire's blog. She's always thinking up easier ways to do complicated things, and we like that!

I thought it would be fun to show this technique using Yupo paper and alcohol ink. I wanted to show how you can die-cut Yupo paper with beautiful results.


For this technique I chose a Poppy die 1840 Gentle Leaf Collage, and the Magenta stamp 07.928.I With Sympathy. 


I applied alcohol ink to a piece of Yupo paper, using the same technique shown here. I wanted to show that you can also die cut the Yupo paper, although it can't be torn. For this piece I used some of my favorite new colors of alcohol ink, Amethyst, Limeade, Valencia, and Turquoise.

In planning my design, first I cut the die out of white paper and placed the Yupo paper colored with alcohol inks behind it. It was pretty, but I wanted the colors of the alcohol ink piece to show up more, and I needed more space for my sentiment.

I put the die onto another piece of white cardstock onto my cutting plates and placed the sentiment where I wanted it. I moved the die around until I thought there would be plenty of room for both; then removed the stamp before running the die through with the white cardstock.

I then arranged my die on the Yupo paper. My goal was for the die to cut through the Yupo paper, but for all the pieces to remain in the paper.

I looked carefully at the back of the Yupo paper, with the die still stuck to the other side. It looked like it all cut through.
Leaving the cut pieces in the Yupo paper, I then carefully placed the front of the white cut out onto the back of the Yupo paper so that they matched up perfectly.

Working on the back of the white die cut piece that is lined up on the Yupo paper, I adhered scor tape to the entire area of the die cut opening.

The effect of this is that there will be adhesive facing through all of the holes in the front of the die cut opening.

Once the back was completely covered, I flipped it over to the front, and the die is still attached to it.

I poked a sharp tool through all of the holes in the back of the die to ensure that the Yupo paper would release from the die.
As I peeled the die carefully away from the Yupo paper, it revealed that the die cut pieces were still in place, and this is what you want. If any pieces fall out (two of mine did), place them back in their spaces. I pressed the colored Yupo side very firmly.

Since I put adhesive on the back of the white panel that is positioned right behind the Yupo panel, all of the die cut pieces in the Yupo panel stuck to that adhesive. The Yupo pieces only stuck where there was adhesive facing through the die cut.

I carefully peeled the Yupo panel off of the white panel underneath, and the die cut pieces of Yupo paper stayed behind, stuck to the adhesive. If any of them tried to peel up with the Yupo panel, I pressed them down with my sharp tool, so that they all stayed behind, stuck to the scor tape.

The white panel has the Yupo pieces beautifully inlaid into the die cut holes, and I have a beautiful Yupo panel that I can use on another card.

I placed the panel into my MISTI to stamp the sentiment, but first I wanted to stamp it onto a piece of grid paper to ensure that it was perfectly straight. After I did all of this work, I didn't want any mistakes at the end.

With the first stamping, the sentiment did not stamp all the way. It took a number of stampings to get it all stamped and I found myself wishing I had used the Creative Corners for the MISTI. Sometimes when you stamp close to the edges some stamps do not stamp well there.

Although I finally got the sentiment stamped correctly, I got a little smudge in the upper right hand corner. I used a Mono Sand eraser to take that out, with no damage to the cardstock. We do sell these erasers at the shop and I highly recommend getting one for your kit.

I hope you will give this technique a try! It's much easier to do it than explain it! It really is much easier than trying to individually place each die cut piece by hand.

To see step by step photos of this technique, please go to my Backporch blog here.

WHAT'S NEW AT ART 'N SOUL:

The second set of Distress Oxide colors are scheduled to be delivered on Wednesday, July 19. We have been taking pre-orders, and they are selling very quickly. Call us to make a paid order and reserve yours.

Ranger has told us that the new Tim Holtz Stamp Platform will start being shipped as soon as they receive them, and they expect them any day. We are taking paid pre-orders for these Platforms, and they are selling very quickly. If you want one, call or come by to reserve yours.

We just received a shipment from our distributor, with lots of things, including scor tape, specialty Deco foils, Nuvo drops, Mono Sand erasers, alcohol inks, Yupo paper and much more!

Pam has scheduled the newest mini class! 
Sunday, July 30th, 1:00 p.m. - 4:00 p.m. "MINI CLASS - CHRISTMAS IN JULY” – Pam Nelson $5 cash or store credit


by Pam Nelson

Do you want to get an early start on your holiday cards? Drop by the store any time between 1:00 p.m. and 4:00 p.m. to make this fun card featuring a new die from Memory Box’s holiday release. Pam will show you how to use two colors of glitter to make a shiny, yet easy, card. Please bring your double sided adhesive and fine tip glue applicator, if you have them.

We will be opening the Memory Box/Poppy catalog in conjunction with this class! The newest collection from Memory Box and Poppy is Holiday and Christmas, and there are some beautiful new dies that you are going to love!

For all the news on classes and events at Art 'n Soul, you can link to our latest email newsletter here. There is a link above on this blog for our calendar, or you can link to it here. Come in and see us soon!