
NUANCE:
I’ve noticed that with frequent use of my Nuance containers the small colored labels in the center of the lid seem to pop off. I like labels with the actual color of the product, so I experimented with various circles to make watercolor labels for all my Nuance colors. My best solution was to use two circle punchesL a 5/8” and a 1-1/8” punch. Another idea is to use two small circles from your nesting circle die sets.
I created some Nuance watercolor “paint” in my palette, and painted 1-1/2” circles of each color on 90# watercolor card stock. (The 90# paper is easier to punch than our usual 140# watercolor paper.) I painted one side of the circle a bit darker, to show the Nuance color both in light and dark shades.
 |
| This photo shows how I made two shades of the same color on the ring. You can always add a little more paint to achieve the two shades of your colored ring. |
My next step was to punch a 5/8” circle in the middle of each of my large painted circles. You can use the punch outs in one of your creations!
 |
This photo shows the 5/8” punch right side up.
|
Next, I held the 1-1/8” punch upside down so I could center the small hole created in step one in the middle of the opening of this larger punch. By centering the small hole and holding the paper carefully, I created an open ring as I punched this larger circle. Viola! Nice rings for labels for the Nuance jars.

You can also just punch out the rings, and THEN paint them, but I found it’s a little more fussy that way.
I dabbed Multi Medium Matte around the edge of the Nuance lid, and then pressed my colored ring onto the Medium. I covered it with a small piece of waxed sheet, and pressed firmly to securely attach the ring label to the lid. I set the jars aside to dry thoroughly.
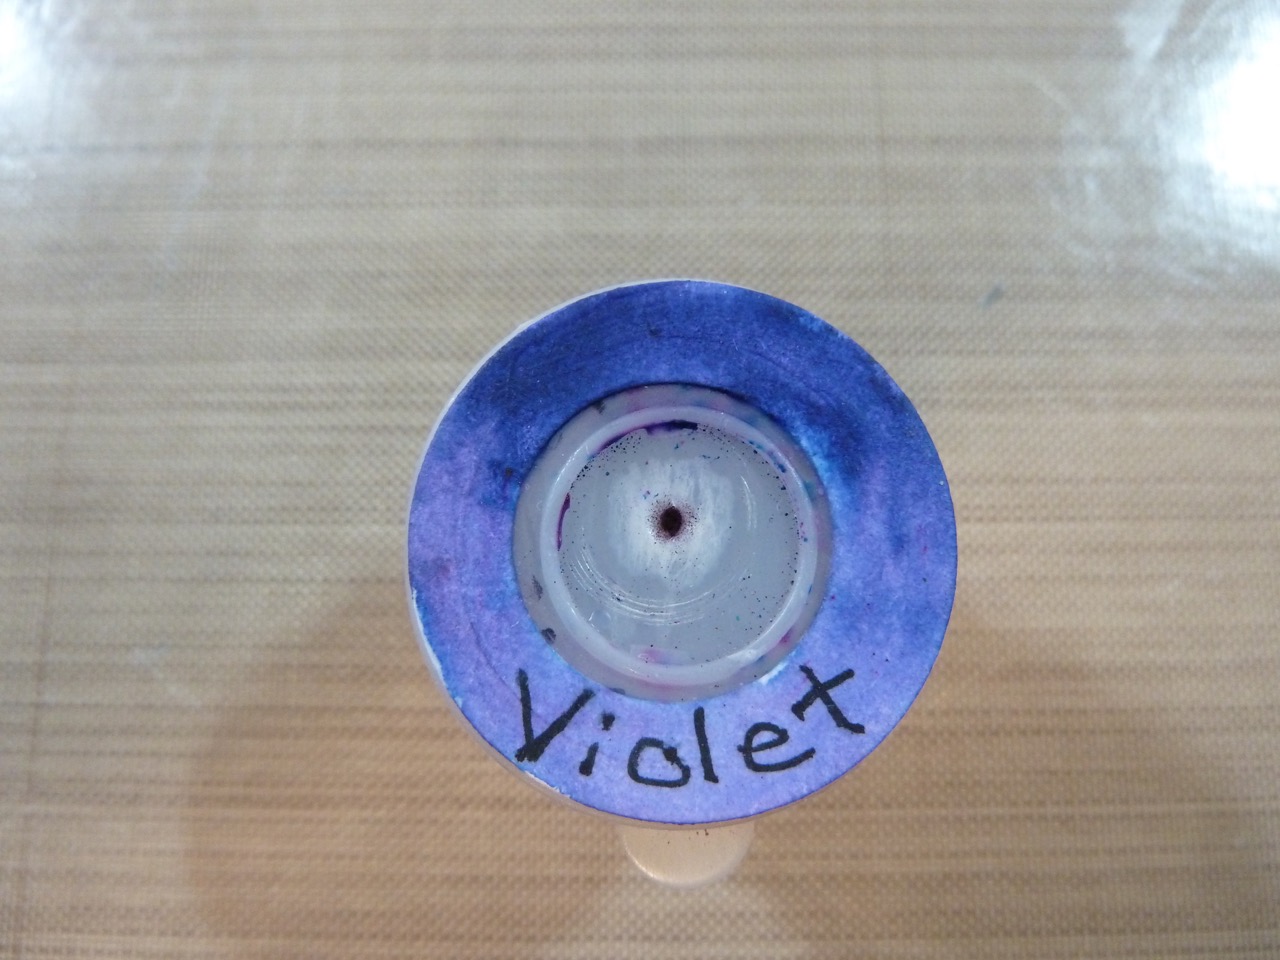
The photo at the top of this post shows my finished labels. I printed the appropriate name of the Nuance color on each ring. I love being able to look at the true colors on my labels as I am choosing which colors to choose for my projects.
DISTRESS OXIDE INK PADS
I rarely store my ink pads upside down, but after I attached velcro pieces to attach the foam circles on the underside of my Distress ink pads, they didn’t slide in and out on my shelves so well. So, I do store these pads upside down, with a label showing the name of the color, and a swipe of the actual color of the ink. I attached them to the side of the pads, and covered them with a strip of packing tape to keep the label nice and clean. Now I can see the actual color of the ink, easily see the name of the color, and the pad slides in and out of the shelf smoothly.

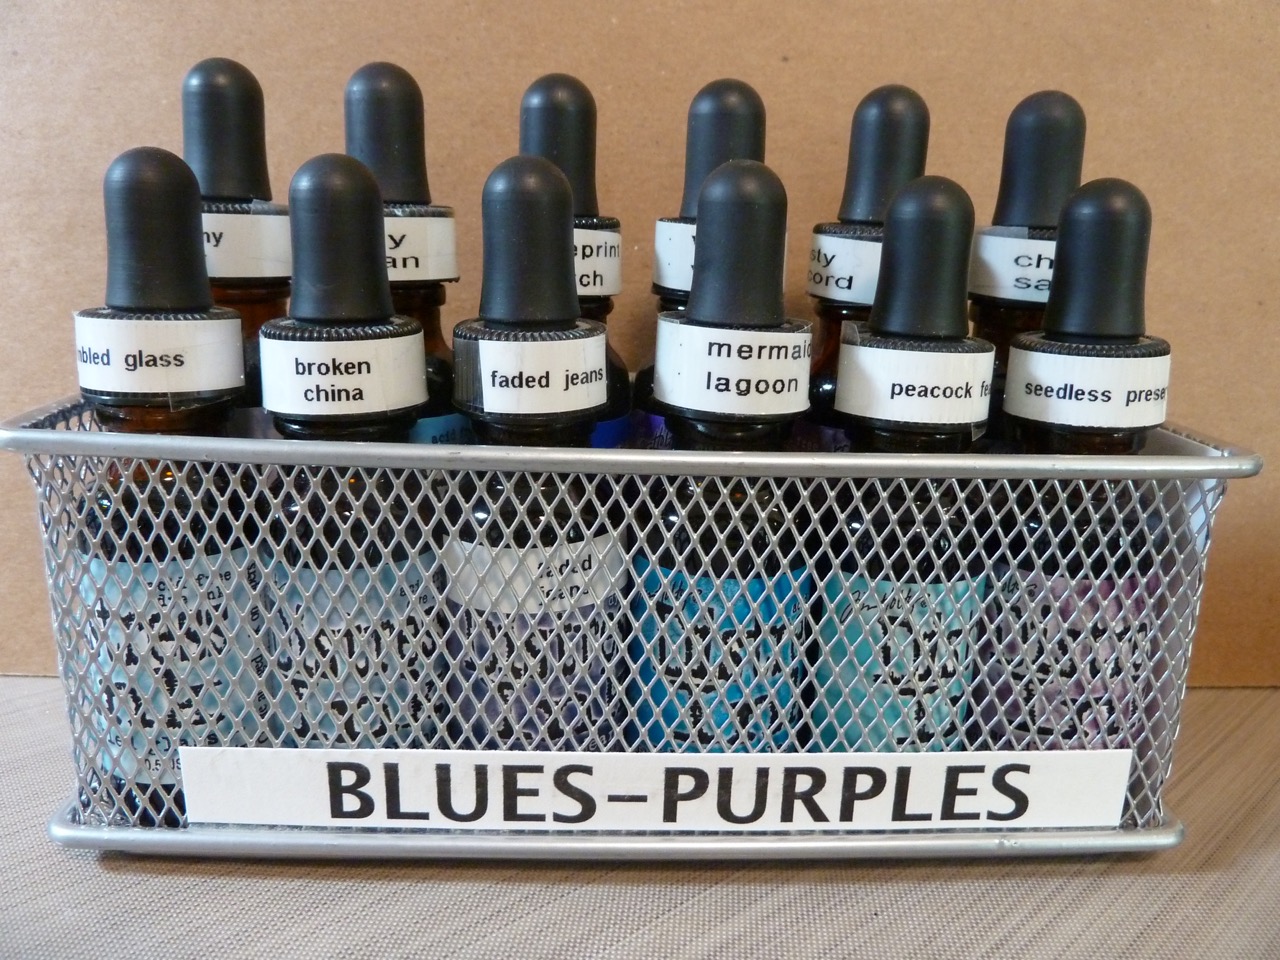
DISTRESS INK REFILL BOTTLES:
I’ve tried a few different containers for my Distress re-inkers, but the printed ink name on the bottom of the bottle always seems to be hidden by the container. I printed the names of all the re-inkers, and attached them to the black plastic rim on the bottle top. I secured the label on the rim with packing tapes. I found these mesh boxes at the Container Store, and they are magnetic, so they attach to my file cabinet making access very handy! I cut some sturdy foam pieces to allow the back row of re-inkers to be raised for better visibility. I have the re-inkers grouped by major colors, and I am enjoying the easy access to my re-inkers now.
If you have some clever methods of labeling art supplies, please share them with us at Art ’n Soul!
CLASSES!!
Lynell Harlow, founding member of Dreamweaver Stencils will be with us this weekend, teaching 4 fabulous classes. There are a few spots left in these classes, so do yourself a favor and call us and sign up!
Friday, August 18th, 10:30 a.m. – 1:00 p.m. "COLOR YOUR STENTANGLE CREATIONS” – Lynell & Wayne Harlow $35
Lynell and Wayne Harlow are back with the easiest of tangle patterns. Lynell will lead the way for those of you who are a bit overwhelmed with creating patterns. She has chosen the simplest pattern she can think of called ‘Brella and used her grid stencil to further simplify the tangling process. Wayne is a Certified Zentangle Teacher, and will be there to assist and help with the nuances of shading and coloring your creations. This class is meant to be fun so bring your favorite colored pencils from home if you have some. The store has some Prisma Color pencils, but it is always nice to use what you have at home so the teachers can give you clear directions for your own materials. Also please bring your Basic Kit, a Micron 01 black pen or equivalent, and a pencil.
Friday, August 18th, 2:00 p.m. – 4:30 p.m. "SIMPLE PLEASURES/INK TRANSFER ETC.” – Lynell Harlow $35
Sometimes the simplest stenciling techniques are the most effective AND the most fun. If you don’t mind inky fingers here are some stenciling ideas that are sure to delight. Ink transfer is one of the easiest ways to achieve motion using metal stencils and digital card stock. Next you will have the opportunity to clean up these prints with three different yet very simple embossing paste techniques…silhouettes, sculpting and metallic paste with glitter. If you are new to metal stencils you will realize that this is an opportunity to add something colorful to your card making repertoire. If you are an advanced stenciler you will see the ease of these techniques for making multiple card designs very quickly. Come join Lynell Harlow, former owner of Dreamweaver Stencils as she returns to the Northwest for a weekend of stencil magic. Please bring your Basic Kit.

Saturday, August 19th, 10:30 a.m. – 1:00 p.m. "LETTERPRESS WITH METAL STENCILS” – Lynell Harlow $35
Bring your Big Shot or Cuttlebug with plates and learn this letterpress printing technique using Memories Mist Sprays and the new Oxide Distress ink pads. Lynell did a quick demonstration of this technique for one of her classes when she was here in the Spring, but this is your opportunity to use metal stencils under her tutelage. Please also bring your basic kit and a Stamping Details thick mat if you have one.

Saturday, August 19th, 2:00 p.m. – 4:30 p.m. "A GLASSY CHRISTMAS” – Lynell Harlow $35Cracked Glass was a very popular class by Lynell this Spring, so this time the emphasis is on Glass with a Holiday twist. Learn the technique so you’ll have a head start getting those Merry cards done early. Use metal stencils and all sorts of mediums to achieve these creative results, embossing paste, thick embossing enamel, snowy embossing powder, and a variety of inks are a few of the materials you will be working with. Please bring your Basic Kit, small stencil brushes and a Picasso stencil if you have one.
This class will be repeated on Sunday, August 20th
Sunday, August 20th, 1:00 p.m. – 3:30 p.m. "A GLASSY CHRISTMAS” – Lynell Harlow $35
Marj, I ALWAYS love your organization ideas. The Nuance labels are wonderful!
ReplyDelete