Friday, September 16, 2016

Technique of the Week: Rainbow Beam Blending

This technique is from Laura Bassen, and it makes a quick, easy and beautiful background. 


You will use Distress blending for this technique, but you will do it through a stencil. This makes the blending so much easier. You don't have to be as careful because you will not get the splotches that you sometimes might get with regular blending.

First I die cut a panel from Neenah Solar White 80# cardstock, using the Lawn Fawn LF768 Stitched Rectangle Stackables die. I used the largest one that gives me a panel approximately 5" x 3.75".

I taped the panel to my craft sheet, and then taped down a Magenta stencil (TM-147 Stained Glass) centered on the panel. I then got two pieces of Post-it tape to use as masking.

Starting at the left bottom corner of the panel with the stencil over it, I put the two pieces of tape close together and then wider apart going up to the top right. This creates a long triangular shape like a beam of light.

To do the blending, I used three colors of Distress ink (Wilted Violet, Peacock Feathers, and Twisted Citron). I started with Twisted Citron, and working from the bottom to the top, I applied the color with a mini blending tool. This goes very fast, since you don't have to worry so much about building up your color.

I then moved the pieces of tape, allowing part of the initial color to show and some white area. I applied the next color, Peacock Feathers, and quickly blended it into the partial line of Twisted Citron that was showing. I worked across the entire card this way, moving the tape and randomly choosing another of the three colors to blend with.

When I removed the tape and the stencil at the end, the results were striking. You can do this technique with lots of different stencils and colors of ink to create a unique one layer card.

To finish the card, I stamped Happy Birthday, using Magenta's beautiful birthday stamp 07.305.G and Versamark Ink. I thought this looked like a birthday card, and this stamp fit in the opening of the Stained Glass stencil perfectly. I embossed the image with Judikins White Diamond embossing powder.

I matted the panel on So Silk Shocking Green cardstock, which goes very well with Twisted Citron Distress ink. I scattered a few sequins, and it was finished! This technique was easy and fast to do, and I hope you will give it a try. You can see more of the step by step photos on my Backporch blog here.


Other Art 'n Soul news:

Come in to Art 'n Soul this weekend and take a fabulous class with Vesta Able! Vesta will be here all weekend for 3 amazing classes! Scroll down for complete info; we still have a few spots left! When Terry Medaris was here, he had wonderful things to say about Vesta and her talent and creativity. We are so lucky to be able to have Vesta here to teach. 

Five new Nuance colors are coming soon from Magenta.  These colors are in production and they will be out very soon, and they are perfect for Fall! We will be the first store to receive these, so if you want them (and you are going to want them) be sure to put in a paid pink sheet order to reserve your set.

We got our Ranger order, and the new Distress Crayon sets are here! Beautiful colors! We also have Yupo paper and lots of the new alcohol ink colors. If you have not used alcohol ink and Yupo paper, we would love to show it to you. You can make the most beautiful backgrounds. We are also all stocked up on the new and beautiful Enamel Accents from Ranger.


Sets 4 and 5 Distress Crayons

New colors of Alcohol Ink and Yupo paper


Enamel Accents from Ranger


Friday, September 9, 2016

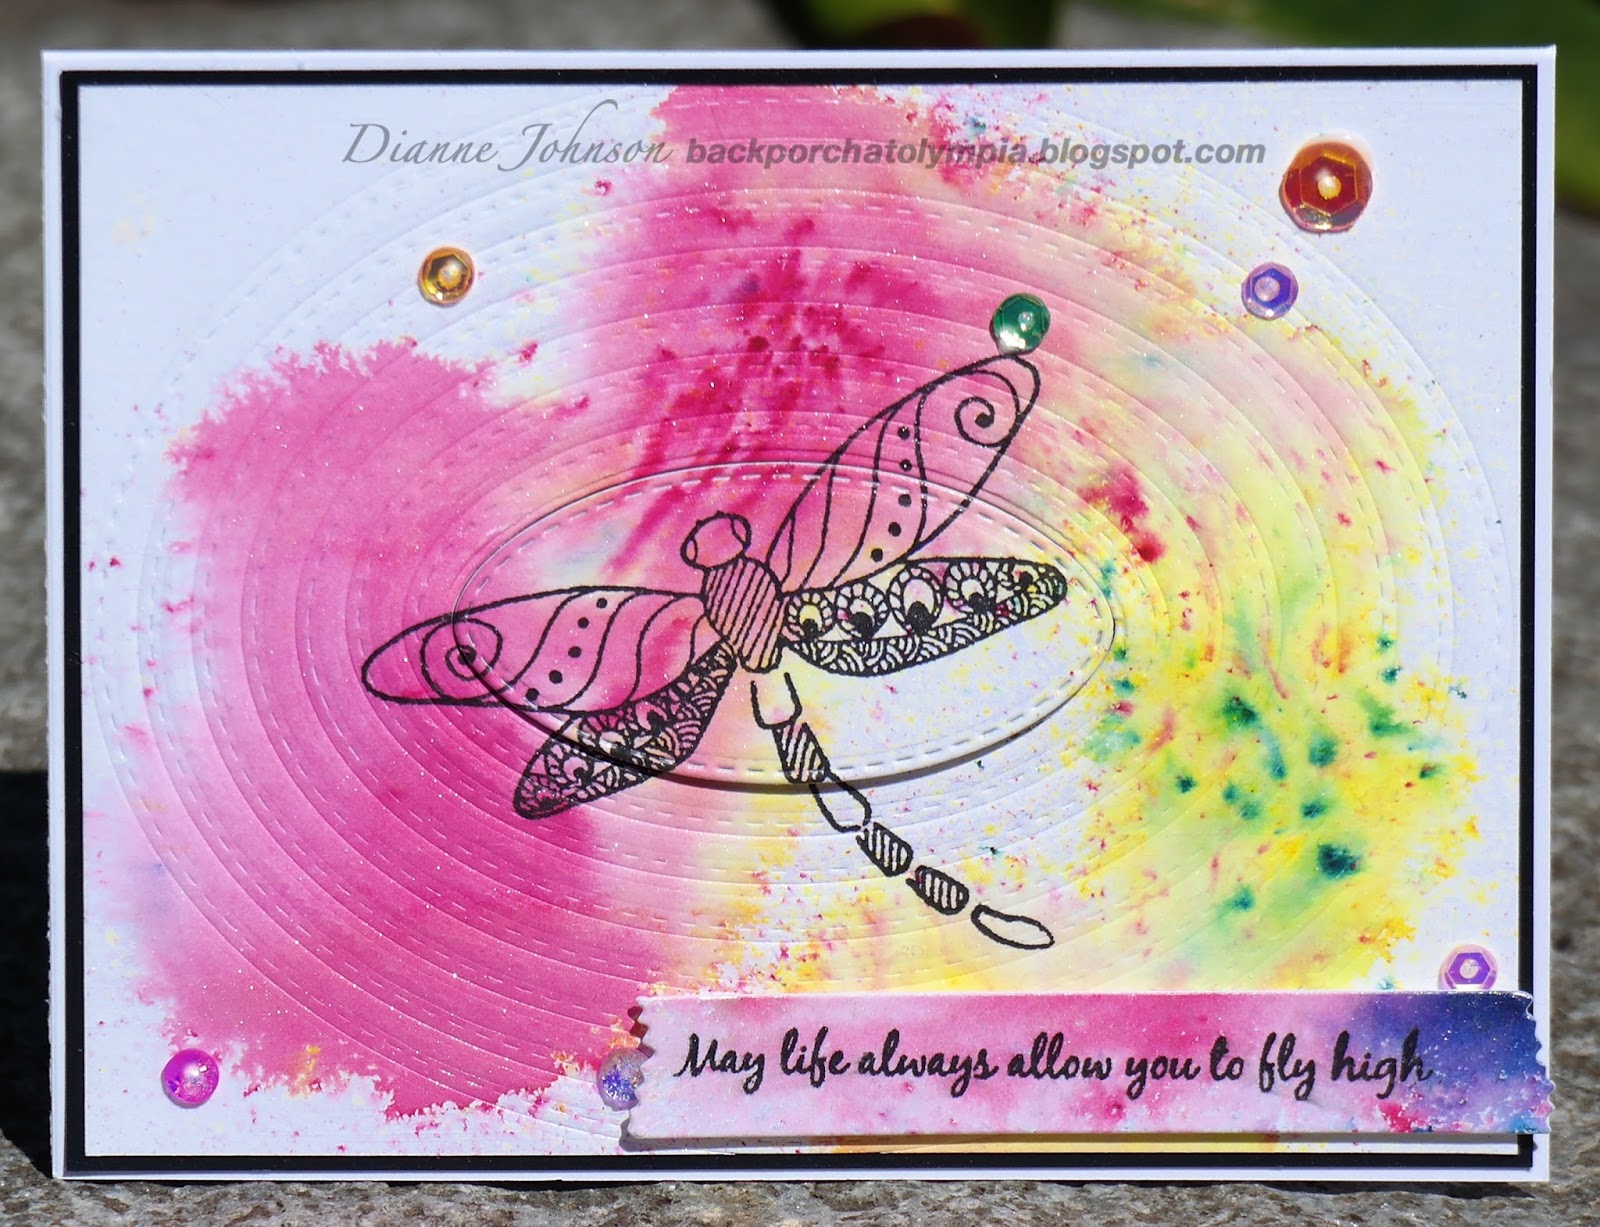
Technique of the Week: Die Impression Backgrounds by Dianne Johnson

I got the idea for this from Jennifer McGuire. I have posted techniques before showing how to use your dies to emboss. This takes that a step further and becomes the whole background. Jennifer's idea was to use nesting dies to create an interesting background.


In this case, I used the Memory Box 30069 Stitched Oval Layers, which we have in stock at Art 'n Soul right now!


I also used my Magenta Zen Dragonfly 44.018.K, and the Magenta sentiment "May life always allow you to fly high" 07.514.G.

First, I laid down 3 rows of scotch tape, sticky side up, and started placing the oval layers onto the tape. The tape keeps the ovals in place. You want them to be as evenly spaced as possible.

I used a panel of watercolor paper onto which I had splashed some Nuance color. I stamped the Zen Dragonfly in Versafine Onyx black ink. I centered the dies over the panel with the cutting side against the paper, and taped them down with washi tape. 


With my base plate configured for embossing (one tab open) I placed my metal shim down, then the dies against the metal shim, with the paper up (cutting side of the dies against the paper). I use this method to keep my dies from getting bent. Next I put a brown rubber embossing mat on top; one piece of cardstock for an additional shim; then both cutting plates on top of that.

The proper sandwich for this is the trickiest part of this technique. You want there to be enough pressure to make a good impression but not too much pressure so that the paper tears. Everyone's die cutting machine is a little different, so you will have to experiment. I had first experimented with regular 80# cardstock, and the metal shim provided too much pressure. Just one piece of additional cardstock for a shim was the perfect amount. However, with the much heavier weight of the watercolor cardstock, the metal shim was needed to give a good impression. The rubber mat is what prevents the dies from cutting.

I absolutely loved the look the embossed ovals gave to my panel! I elected to go one step further and die cut the very center of my panel with the smallest oval. This part of the panel was where most of the dragonfly image was stamped. I popped up the image in the center.

I stamped the sentiment and die cut it with one of the strip dies from Die-namics Blueprints 13. The sentiment was popped up and sequins were added.

The card was matted with So-Silk black cardstock. I hope you give this technique a try. It was easy and it really gives texture and interest to a card. 


To see additional pictures of the process of this technique, please visit my blog at Backporch here.

Great News!!
Our Ranger order is scheduled to be delivered on Wednesday! We will be receiving more of the great Enamel Accents in all of the colors; some Tim Holtz multi media dies with Halloween and Christmas themes; more Yupo paper and the new alcohol ink colors; THE TWO NEW SETS OF DISTRESS CRAYONS ARE COMING!!! WEDNESDAY! BE THERE!

Pam Nelson will be teaching her fabulous class on alcohol inks on Yupo paper. There are two spots left in the afternoon class from 2:00-4:30. Call in and sign up for this great class. You will be so glad you did!

Here is one of the gorgeous samples from Pam's class


Friday, September 2, 2016

Technique of the Week: Recycled Art Materials by Marj Marion

Marj has found a fun use for those foil "security" liners covering various yogurt containers! Here's how she creates interesting cards using these liners, some dies, and some embossing folders.


After washing the liners to remove any food particles, dry the foil liner, and use a bone folder or brayer to flatten the liner and any wrinkles it may contain. Strive for a nice smooth surface.

Apply glue stick to a piece of 65# card stock, press the liner to the glued surface, and cover with a waxed sheet to protect the liner while burnishing.  Be sure the plain foil side is facing up! Burnish with a bone folder or brayer to secure the liner to the card stock. Note, the 65# card stock has enough body to give the liner stability, but not too heavy to get a good impression later when used in an embossing folder. Remove the wax sheet.


Rough cut the shape, trim to desired size, or cut out desired shape with a craft die.

Insert your foil creation into the embossing folder of your choice and run through your die cut machine.

Add Alcohol Ink to your creation if desired, dry with a Heat Tool, and add to your card creation.


by Marj Marion

Just for fun, challenge your card’s recipient to guess the source of the metallic layer!


by Marj Marion

Stop by the store on Recycled Rubber weekend to see the cards in person.

Recycled Rubber is this weekend, Saturday, September 3rd 10:00-5:00, and Sunday, September 4th 12:30-5:00. We have so many items in the sale, you do not want to miss it!

BONUS!!
MARJ WILL BE DEMO'ING AT RECYCLED RUBBER THIS SATURDAY!!

From 10:00 a.m. - 1:00 p.m. on Saturday, September 3rd, Marj will be here to demo a fabulous ink layering technique using the MISTI tool. This technique features Scenic stamping with color layering, pioneered by Virginia Liu and Jill Foster. This technique will blow you away! If you don't have a MISTI, we have just a few more in stock.

Five new Nuance colors are coming soon from Magenta. Here's a sneak peek!


 As soon as Helene gets back to Magenta from teaching classes at Art 'n Soul, she will begin production on these fabulous new colors, and they are perfect for Fall! We will be the first store to receive these, so if you want them (and you are going to want them) be sure to put in a paid pink sheet order to reserve your set.

You may have seen on Facebook or in our Newsletter, we received the larger size Tim Holtz Crazy Dogs! 


Tim Holtz Crazy Dogs by Stampers Anonymous

We have them in stock right now, so some in right away to get yours. The dies are supposed to be out later this month.

Friday, August 26, 2016

Technique of the Week: Use Those Napkins


How many of you have a stash of some beautiful napkins that you have collected over the years to use with various techniques for your cards?  I know I have a stack of them that I just can part with.  I was recently watching a video by Els of Elizabeth Crafts.  She suggested using the Elizabeth Crafts Silk Microfine Glitter on napkins so I thought I’d give it a try.


I went through my stash of napkins and found one that would work well on a 5 ½” square card.  I separated the three layers of the napkin and cut one square of the napkin for my card.  I cut a piece of white card stock to about 7” x 7” and used a glue stick to cover it with glue. 
I adhered the napkin layer to the piece of cardstock and smoothed it out so there were no wrinkles in the napkin. 


I cut several strips of wide Scor-Tape and placed it over the napkin, covering the entire surface. 
I used a bone folder to smooth it out and ensure it was firmly adhered to the napkin.  I removed the top layer of the Scor-Tape and placed the piece on some wax paper (you could also use a coffee filter.) 


I sprinkled Elizabeth Craft Cool Diamond Silk Microfine Glitter over the entire surface and spread it around with my finger to ensure it was covered.  I tapped off the excess glitter and returned it to the jar. 
I used the cover sheet from the Scor-Tape to burnish the glitter, pushing it into the adhesive.  You can also use a bone folder for this. 
The more you burnish the glitter, the greater the shine. 

Elizabeth Craft Silk Microfine Glitter comes in number of colors to include Warm and Cool Diamond.  The Cool Diamond that I used on this project has a slightly blue tone to it and works well on projects with blues, purples, etc.  The Warm Diamond glitter has a slight rose tone to it and works well on reds, oranges, etc.


I trimmed the napkin down to the size I wanted for my finished card.  This particular napkin had a natural edge on it that I trimmed around. 
I mounted the napkin on a piece of 5” square Glamour Green So Silk paper.  I then adhered the piece to a square of 5 ¼” square Fashion Purple So Silk paper and lastly adhered them to a 5 ½” square card.  I used the new Grape Soda Enamel Accents in the corners. For the sentiment I cut a tag using the second smallest die from the MFT Die-Namics Stitched Traditional Tag Stax (MFT-525) and stamped it with a sentiment from the Penny Black Special Thoughts stamp set (#30-338).  I shaded it slightly with Distress Twisted Citron.  I cut a piece of foam tape slight smaller than the tag and adhered it to the back of the sentiment.  I adhered it to the front of the card and added a couple of highlights with Pink Gumball Enamel Accents. 

This was a fairly quick and easy card and provides another way to use up those beautiful napkins.  You can see the card at Art ‘n Soul and I hope you will give it a try.


Friday, August 19, 2016

Technique of the Week: Bling it Up with Ranger Enamel Accents


We recently got in some new Enamel Accents from Ranger. I absolutely love how they look on a card, and Ranger has come out with so many beautiful colors!

New Ranger Enamel Accents and Dylusions Acrylic Paint

Since I am so in love with anything sparkly or shiny though, I kind of wanted some bling on my accents. Enter Warm Diamond ultra fine glitter, from Elizabeth Crafts.


I made two cards, one pink and red, and one blue and green. To make these, I first used Nuance powdered color (by Magenta) on watercolor paper to color the backgrounds. For the pink and red card I used Red, Scarlet, Hot Pink and Raspberry Nuance; for the blue and green and, I used Yellow, Turquoise, Cerulean Blue and Royal Blue. Credit goes to Marj Marion for inspiration on the design of these cards.

When the Nuance panels were dry, I stamped the Magenta Multilingual Happy Birthday stamp (C07.907.L) on each of them using Versamark ink. I embossed the sentiment with Judikins White Diamond embossing powder.


I cut the Nuance colored pieces out with one of the Die-Namics MFT-847 Inside/Out Stitched Rectangles. I cut a piece of white fun foam to pop the panels up, and adhered it to the back of the panel.

I then cut out a piece of white cardstock for each card, using the Lawn Fawn LF768 Small Stitched Rectangle Stackables die. Using the largest die in this set, I was able to cut out a stitched panel that measures 5" x 3.75".

I adhered the white pieces to matting panels that measure 5.25" x 4", and the matting panels were adhered to the base cards. The matting panels I chose to match the colors in the Nuance were So Silk Glamour Green and So Silk Beauty Pink. The Nuance panels were then placed in the center of the base panels.

Once the cards were put together, I applied some Ranger Enamel dots to the front of the cards, squeezing the enamel out slowly and carefully to form round dots.  For the pink/red card I used Pink Gumball, Classic Cherry and Wild Orchid; for the blue/green card, I used Electric Lime, Caribbean Coast, and Blue Ribbon.


While the dots were still wet, I liberally sprinkled Elizabeth Crafts ultra fine Warm Diamond glitter on top of them and let it sit there until they had dried.


Once the dots dried, I rubbed them to brighten the glitter. The glitter did alter the look of the dots somewhat, but I like how they look.

I love the extra sparkle this technique adds, and I hope you give it a try!


You can see more pictures of this process on my Backporch blog here.

Friday, August 5, 2016

Technique of the Week: Foiling with the Minc Toner Pen


Some time ago, we had a playday to explore techniques with foiling. Some of the most effective techniques require a laminator or a Minc machine. Don't let that turn you off of this technique though, because a laminator can be purchased relatively inexpensively.

When we played with foiling before, we were die-cutting sheets of toner covered paper, and putting those through the laminator or Minc machine with pieces of foil (pretty side up) on top on the die cut. The heat from the laminator would melt the toner, and the foil would fuse to it. This works beautifully well, and is a lot of fun.

Recently, Minc has come out with pens that put toner ink onto your paper. Using these, you can foil something that you write or draw or color. The pens come in two different sizes: 2mm and 4mm. I used the 4mm for this technique, since our distributor backordered the 2mm pens. I found the 4mm was especially good for putting toner ink onto a stamp, and I could also color with it.

The toner pen's nib starts out white, and you must press the tip down onto a piece of paper multiple times to get the ink to come down into the nib. This took longer than I expected, but it eventually did start to flow.

1. For this project, I stamped a Magenta Doodle Feather stamp (37.289.K) onto a piece of Neenah Solar White 80# cardstock.

2. I colored parts of the Doodle Feather with the toner pen.

3. After placing a piece of foil (Decco Rainbow foil) over the stamped and colored image, with the pretty side up, I put the card and the foil into a carrier and inserted it into the Minc machine. I used the #4 setting. I have also used a laminator before with foil and toner, and it works quite well. You do NOT have to have a Minc machine for this to work.

4. I was quite surprised and pleased to see the results after coloring the feather and feeding it through. All of the areas that I had colored came out beautifully foiled.

5. I cut the image out using Memory Box Stitched Oval Layers (30069 - in stock at Art 'n Soul) with the 2nd and 4th largest ovals.

6. The sentiment stamp, Magenta 07.876.F You are Awesome, was stamped onto a stamp positioner plastic sheet with Versafine ink, and I then inked the word "Awesome" with the toner pen. Using the stamp positioner, I quickly stamped the word "Awesome" onto the oval, under the feather, in toner ink.

7. I put a piece of the rainbow foil over the word, and ran it through the Minc machine. The word came out beautifully foiled.

8. I cleaned the stamp, taped over the word "Awesome" and inked the rest of the stamp with Versafine ink. The tape was removed, and again using the stamp positioner, I stamped the rest of the sentiment onto the oval.

9. To construct the card, I chose a matting square of So Silk Glamour Green cardstock. I adhered the larger oval (frame) to the matting layer.

10. A piece of white fun foam was die cut using the next smaller oval die to the center oval piece (5th largest). The fun foam was adhered to the back of the center oval, and the oval was adhered in the center of the framed oval, making sure to match the stamped and foiled feather.

11. Last some sequins were adhered using Ranger Multi Medium Matte adhesive. I found this card easy and fun to make, and I will definitely use the Minc toner pen for multiple cards.

To see step by step photos of this technique, please visit my Backporch blog here.


Terry Medaris will be here next weekend!!
Beginning Friday, August 12, Terry Medaris will be here to teach his fabulous Prismacolor workshops. Terry had to open two sessions of his beginner workshop, but if  you have ever taken a class with Terry, you do not need the beginner class to take his other classes. 

Come in and see the samples for the Make it and Take it class, which include a tile, a domino and a shrink plastic image. 

The second Make it and Take it class is for making the most beautiful pendants. You really have to see the samples in person to get an idea of how gorgeous these are (and they would make amazing Christmas or Birthday presents). Terry's jewelry class has been reworked this year, so if you have taken it in the past, you should really take it again. 

Terry's classes are such a bargain - if you take more than one class, they are only $30 each! All of the items are made using Terry's unique and stunning stamps. Terry will also be bringing a trunk show of his stamps and other things with him. You do not have to take a class to come in and participate in the trunk show.


Beginner Prismacolor Blending with Terry Medaris
August 12, 2016
Two Class times available: 1:00 - 4:00 p.m. and 5:30-8:30 p.m.
In this class you will learn my blending techniques, then color one of my designs using your Prismacolor pencils. This class is a prerequisite to take my other classes. If you have taken this class in the past, you have satisfied the requirement. Bring Basic Kit and a set of Prismacolor pencils (prefer at least set of 48).


Make and Take It with Terry Medaris
Saturday August 13, 2016
10:30 a.m. - 1:30 p.m.
Using the techniques you learned in the beginning class, you will stamp on, then color a ceramic tile, a domino, and a piece of heat-shrink plastic. Bring Basic Kit and a set of Prismacolor pencils (prefer at least set of 48).


Saturday, August 13th, 2:30 p.m. – 5:30 p.m. "JEWELRY CLASS MAKE AND TAKE IT" – Terry Medaris $35 (If more than one class is taken, each class is $30)

Using the techniques you learned in the beginning class, you will stamp a piece of pre-punched art board; then color and mount your art into three different shaped metal jewelry pendants to create your own beautiful personalized jewelry pieces. Bring Basic Kit and a set of Prismacolor pencils (prefer at least set of 48).