Showing posts with label Wink of Stella. Show all posts

Friday, May 20, 2016

Technique of the Week: Shine, Shine, Shine


This week’s technique features Wink of Stella brush pens on vellum paper.  You will be amazed at the shine you get when you use these pens on vellum.  I saw this technique on Jennifer McGuire’s blog and I couldn’t wait to try it.


To get started I cut a piece of 36# vellum to 4.25” x 5.5”. Because I planned to emboss my stamped image I used a powder tool over the surface of the paper. I put the paper in my MISTI and positioned the Magenta Azalea stamp (14.651.Q) from their Spring/Summer collection on my vellum paper. I picked it up with the cover of the MISTI and then inked it with Hero Arts Unicorn White Pigment Ink. Next I applied Judikin’s White Opaque Embossing powder over the stamped image.

When heating the embossing powder on vellum paper you need to be careful so that you don’t warp or melt your paper (speaking from experience unfortunately!) Before you direct your heat gun to your paper, let it run for about 30 seconds or so to be sure it is up to temperature. Keep the heat gun moving over the surface of your vellum. You can also heat it from the back of the paper, just be sure to keep the heat gun moving. It takes a bit longer to emboss on vellum but for your patience you’ll be rewarded with a beautifully embossed image. The embossing powder will act as a ridge to help remain within lines when you are painting.


I put the image on my craft sheet and collected my Wink of Stella pens. The Wink of Stella brush pens come in 15 colors, plus clear. I only have four pens – clear, dark pink, green and yellow, but after doing this technique I certainly plan to buy more!


Before I started I used a scrap piece of vellum to try some blending. I originally planned to blend some of the yellow with the green to create a yellow-green color for the leaves and blend some of the yellow with the dark pink to create a shade of orange for the center of the flowers. I ultimately decided to keep it simple and just use green, dark pink and clear for this image. 


I started with the leaves on the azalea image using my green pen. I started at the base and painted about half way down the leaf. Then I used my clear pen to blend the color to the tip of the leaf. I continued with all of the leaves in this manner. The Wink of Stella stays wet for a bit longer on vellum than it does on regular paper so you can blot up excess color with a paper towel, add more color or do more blending.


Once I finished the leaves, I started on the flower. I followed the same technique as with the leaves. I applied dark pink to the center and then used clear to blend the color out to the tips of each petal.  


To finish the card I adhered a piece of So Silk Beauty Pink (cut to 4.25” x 5.5”) to the front of an A2 card. Since I planned to add the frame you see in the photo. I applied 1/8” Scor Tape to the back of the vellum and then attached it to the front of the card. (As you can see from the photo, regular adhesive shows through vellum so if I hadn’t planned to add the frame I would have used Vellum adhesive to attach the image to the card.)


I cut a piece of textured white cardstock to 4.25” x 5.5” and then used Spellbinders A2 Matting Basics B (the 3 3/8” x 4 5/8” die) to cut a frame. To give the frame some dimension, I adhered foam tape to the back of the frame. I just cut the foam strips in half lengthwise as shown, removed the backing paper and adhered to the frame to the front of the card. I added a few iridescent sequins using Ranger Matte adhesive. I also like to use the Pico Shimmer embellisher to add an additional drop of shine on my sequins. I set the card aside to let it the sequins and Pico dry overnight.

Once I decided on the colors I was going to use for the image, this card came together very quickly so I hope you will give it a try. I encourage you to try blending the colors you have because these pens blend beautifully. This is another good technique where you can stamp several images at one time to have them available when you have a few minutes to paint. The photos don't fully capture the shimmer so please stop by Art 'n Soul to see this card in person. 

Friday, February 19, 2016

Masking with Nuance


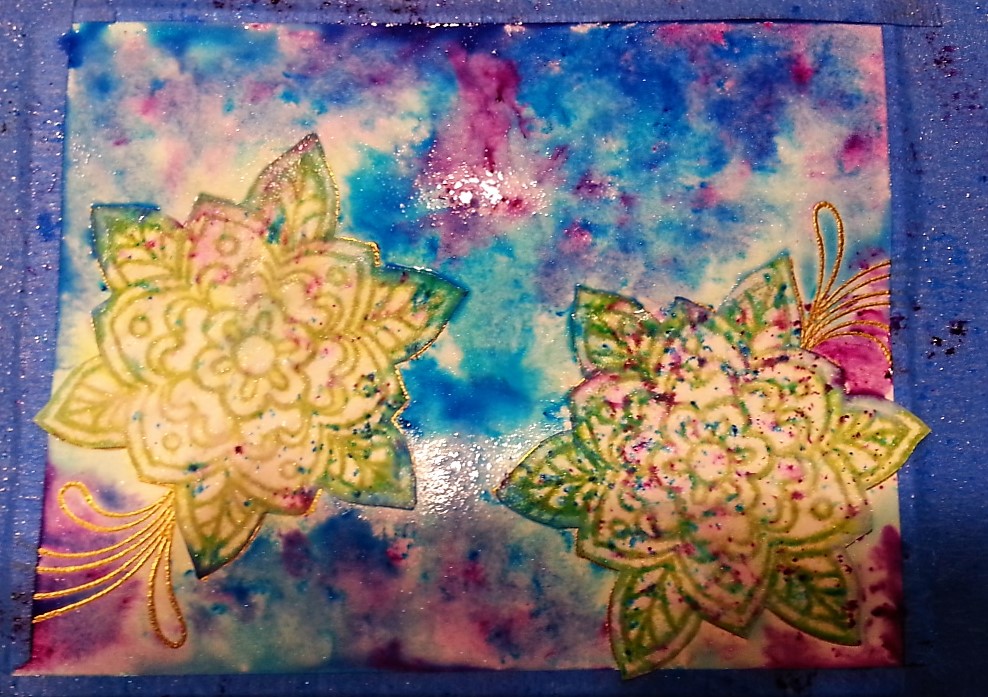
This week’s technique features another fun way to use the beautiful Magenta Nuance powders.  I masked off the stamped image and then added Nuance, leaving the stamped image white.  Here’s a list of the materials I used for this card (and everything but the bleach is available at Art ‘n Soul!):

Magenta Bohemian Flower (85.008.O)
Magenta Merci (07.623.G)
Versamark Ink
Judikins Gold Detail embossing powder
Stamping Mask Paper
Nuance colors Turquoise, Raspberry, Cerulean Blue (and Grass Green for the leaves)
Perfect Pearls
Water brush with bleach
Wink of Stella
Scrap of ribbon

First, I stamped the Magenta Bohemian Flower twice on a piece of 4 ¼” x 5 ½” watercolor paper with Versamark and then embossed with Judikins Gold Detail embossing powder.  I taped this to my work surface to keep the paper from buckling when I added the Nuance and water.  


To create the mask I stamped the Bohemian flower twice on the white side of a piece of Stamping Mask Paper.  I cut out the flowers and then removed the blue protective sheet.  I then placed the flower mask on each of the stamped images and pressed firmly to make sure the paper adhered to the watercolor paper.  (I apologize about the quality of the next few pictures here!  They looked okay on my phone but not so great when I put them on the blog.)

I sprinkled Nuance over the project and then sprayed with water mixed with Perfect Pearls.  I used a small watercolor brush to move the color around to the edges of the embossed image. 


I blotted off extra water with a paper towel where it pooled and added more colors and water until I was satisfied with the look.    


When the image was dry, I lightly painted the stems using a water brush filled with bleach to lift the color.  When that was dry I put a small bit of Grass Green Nuance on my craft sheet, spritzed with lightly with water and used a small watercolor brush to paint the stems.


On a small scrap of watercolor paper I stamped Magenta’s Merci stamp with Versamark and embossed with Judikins Gold Embossing powder.  I used the same Nuance colors as on the base card but after spraying with water mixed with Perfect Pearls, I blotted with a paper towel almost immediately to keep the background light.  I trimmed it and rounded the corners.

After removing the tape from the base, I trimmed it and added a piece of ribbon for the sentiment.  I layered it on a piece of So Silk Beauty Pink and then mounted to an A2 card.  I attached the sentiment.  For an added bit of sparkle I highlighted parts of the flowers with clear Wink of Stella.  

I hope you will try this card.  Yes, there are several steps but it was fun to do.  It would work especially well for stamps that have matching die sets because you wouldn’t have to hand cut the stamp mask.

There’s still time to enter our Nuance contest.  We’ll be taking entries until February 25th and the prize is a $10 gift certificate to your favorite store, Art ‘n Soul!